Need GPU power without buying and maintaining your own hardware? Momo Cloud lets you launch it on demand from the client area, so you can go from plan selection to a ready-to-use server through the same interface shown in the screenshots.
This guide keeps the process beginner-friendly without losing the practical details. The example flow uses an NVIDIA A40 plan with hourly billing in the EWR region on a Linux operating system.
What a GPU instance is and when to use one
A GPU instance is a cloud server that includes graphics processing unit resources alongside standard compute resources such as vCPU, RAM, and disk. In practice, that gives you a server that is better suited to parallel, compute-heavy workloads than a CPU-only VPS.
That matters because many modern workloads benefit directly from GPU acceleration. AI inference, fine-tuning experiments, image generation, video processing, and accelerated numerical computing often run much faster with a GPU attached. Instead of provisioning physical hardware yourself, you create the instance in Momo Cloud, wait for deployment, and connect to it like any other cloud server.
Typical workloads that fit a GPU instance
- AI inference: serving a model that answers prompts, classifies images, transcribes audio, or powers a chatbot or internal tool.
- Model testing: validating whether a model, framework, or container works correctly before moving to a larger deployment.
- Machine learning experiments: training or fine-tuning smaller workloads, running notebooks, or testing CUDA-enabled libraries.
- Rendering and media workloads: certain rendering, transcoding, or image-processing pipelines can benefit from GPU acceleration.
- Scientific and accelerated compute tasks: some simulations and analytics tools use GPU compute to reduce runtime.
A GPU instance is not always the right choice. For a normal website, a small database, a control panel, or lightweight application hosting, a regular VPS is often the more cost-effective option. The value comes from using the accelerator for work that actually needs it.
What this guide covers
This walkthrough focuses on creating the instance through the Momo Cloud interface at cloud.momo.tz. It follows the same order as the GPU creation flow in the client area: choose a plan, select the operating system, configure the instance, review the details, and create it.
The example configuration used in this walkthrough
To keep the steps concrete, the screenshots show an example instance built with an NVIDIA A40 entry in the plan list. In that example, the plan uses hourly pricing, the selected region is EWR, and the instance is created with a Linux operating system. Later, the created instance overview shows an Ubuntu-based deployment, which is a practical starting point for many AI and developer workflows.
| Example item in this guide | What it shows | Why it matters |
|---|---|---|
| NVIDIA A40 | The GPU family selected in the sample flow | Helps you identify the same plan screen and understand the GPU choice step |
| Hourly billing | The rate is displayed per hour | Useful for short-term testing, development, and controlled-cost experiments |
| EWR region | The deployment region shown in the review screen | Confirms where the example instance is being created |
| Linux OS | A Linux-based operating system is selected | A common choice for AI tools, SSH access, drivers, and server-side workloads |
What to expect after you click create
Provisioning is not instant. After you submit the instance, Momo Cloud needs time to create the server, attach the selected resources, and complete deployment. The platform shows the GPU instance as deploying before it later changes to a ready or running state.
Tip: Treat the create step as the start of provisioning, not the start of immediate access. Wait for the platform to show that the instance is running or ready before you try to connect or install software.
What you need before you begin
A few minutes of preparation make the creation flow much smoother. Before you start, make sure you can sign in to the client area, confirm that your wallet has enough balance, and decide the core settings you want to use.
Have your account and wallet ready
You need an active Momo Cloud account and access to the client area at cloud.momo.tz. This is where you will open GPU Cloud, choose the plan, select the operating system, configure the instance, and manage it after deployment.
GPU instances are billed hourly, so wallet balance matters before launch. In the screenshots, one example shows a plan priced at 258 TZS per hour, a visible minimum launch amount of 258 TZS, and a wallet balance of 3,483 TZS, which the interface estimates as enough for about ~13.5 hours at that rate.
| Item shown in the interface | Example from the screenshots | Why it matters |
|---|---|---|
| Hourly rate | 258 TZS/hour | Tells you the running cost of the selected GPU plan |
| Minimum to launch | 258 TZS | Indicates the minimum wallet balance required to create the instance |
| Wallet balance | 3,483 TZS | Shows the funds currently available |
| Runway estimate | Enough for ~13.5 hours | Helps you estimate how long the instance can stay online at the current rate |
Warning: Being able to click Create instance does not mean you have enough balance for the whole job. The minimum launch amount only gets the instance started; the runway estimate is the more useful planning number.
Decide your core configuration values in advance
Before you begin the wizard, it helps to know the GPU plan, hostname, optional label, whether you want backups, whether to enable IPv6, whether DDoS protection matters for your use case, and whether you will paste an SSH public key during setup.
Plan selection is not only about price. In the screenshots, one example plan is NVIDIA A40 1/24 GPU with 2 GB VRAM, 1 vCPU, 5 GB RAM, and 90 GB storage at 258 TZS/hour. That can suit lightweight experiments, basic inference, or testing, while heavier workloads may need more VRAM, RAM, CPU, or storage.
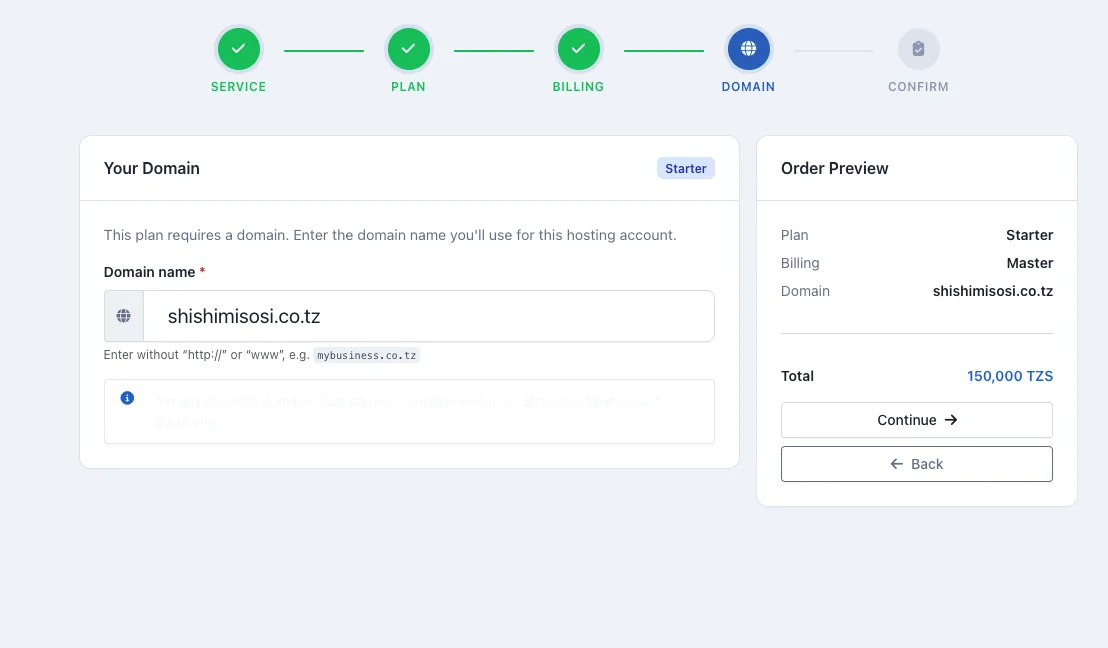
It is also worth deciding on a sensible hostname and label up front. The example screens show myai.juma.com as the hostname and juma doctor ai as the label. Those fields are optional, but thoughtful naming makes future management much easier.
If you plan to use key-based login, have your SSH public key ready. The configuration form expects the public key, usually beginning with ssh-ed25519 or ssh-rsa, not the private key.
Sign in to the client area and open GPU Cloud
Start at cloud.momo.tz and sign in with your Momo Cloud account. The login form includes fields for your email address and password, plus a Keep me signed in checkbox and the Sign in button.

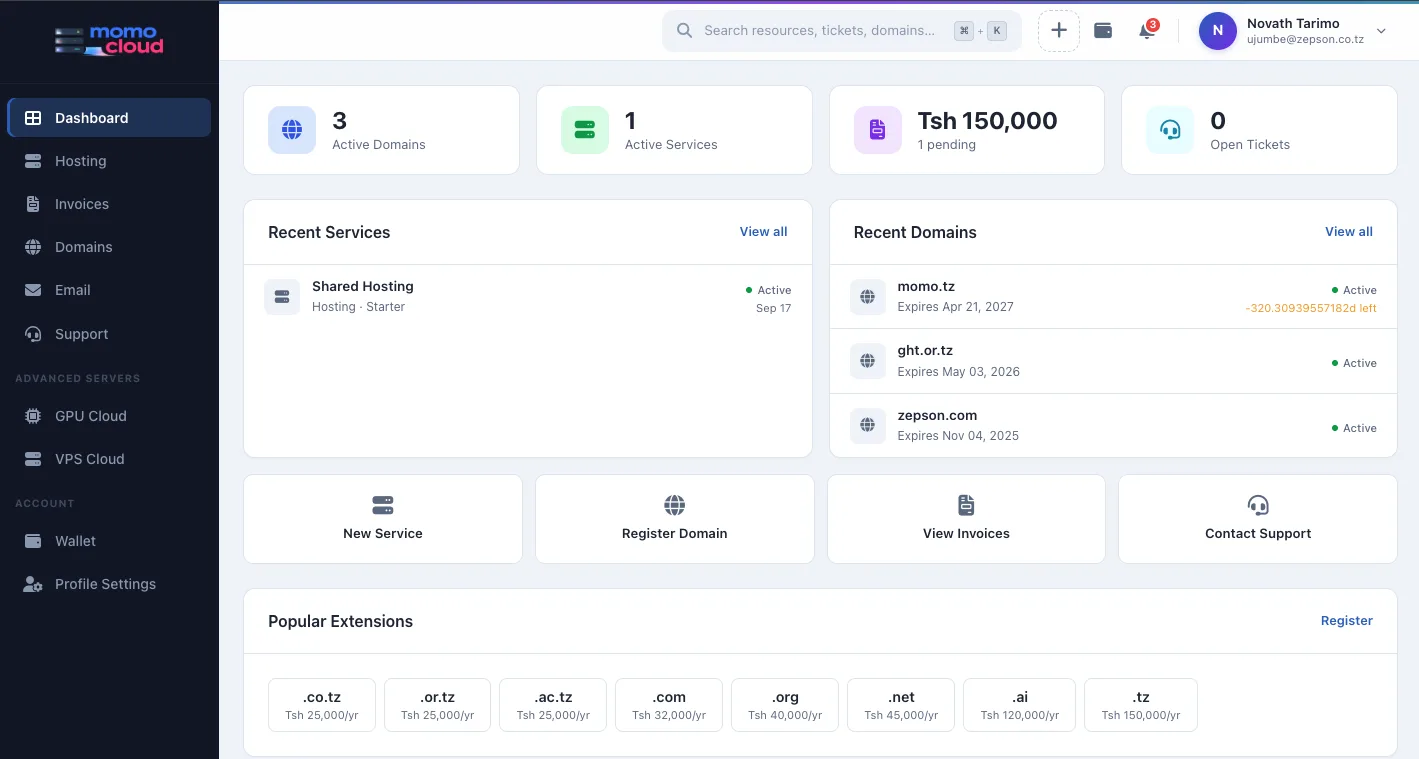
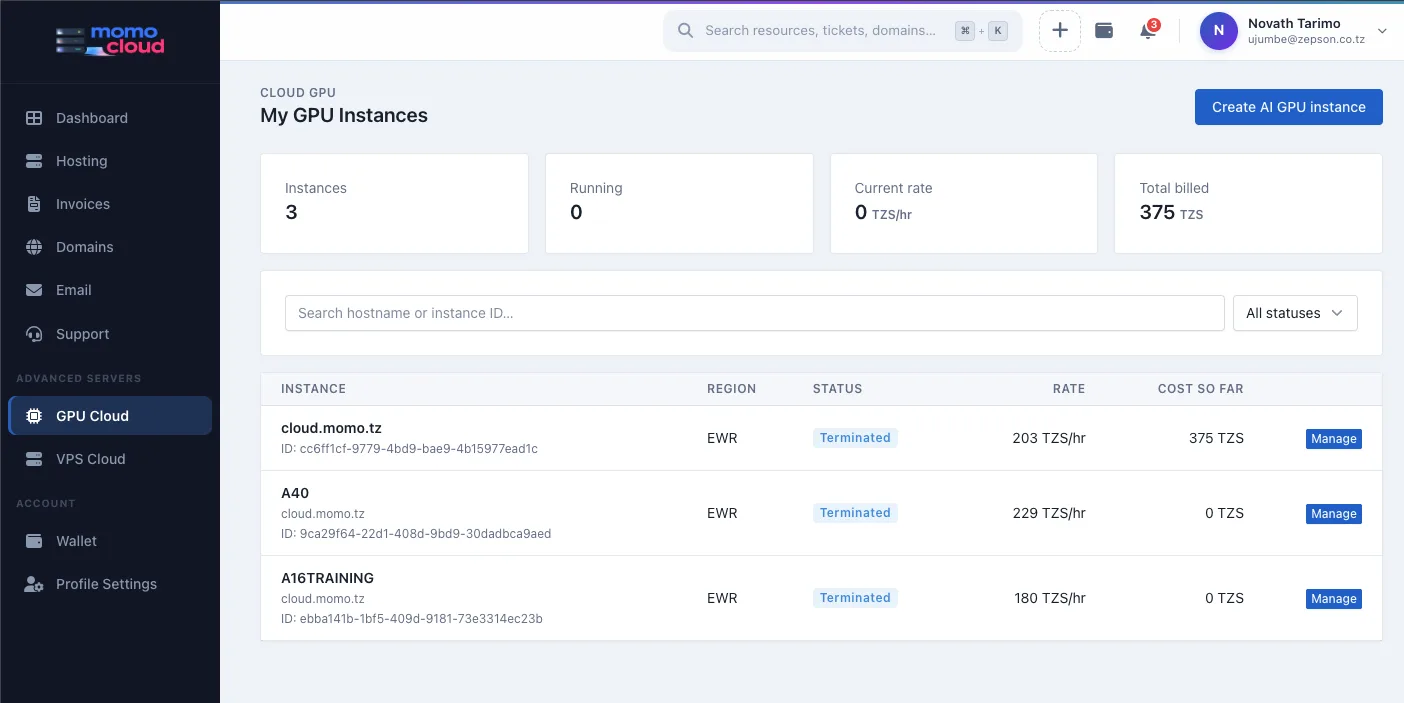
After sign-in, you land on the dashboard. From the left sidebar, open Advanced Servers and then click GPU Cloud. This takes you to the My GPU Instances page, where you can review existing services and start a new deployment.
When you are ready, click Create AI GPU instance. The creation wizard shows four steps across the top: Plan, OS, Configure, and Review.
Tip: Use Keep me signed in only on a device you trust and control. On a shared device, leave it unchecked and sign out when you are done.
Step 1: Choose your GPU plan
The Plan step is where you choose the GPU option and the attached compute resources. It is the decision that most directly affects both performance and hourly cost.
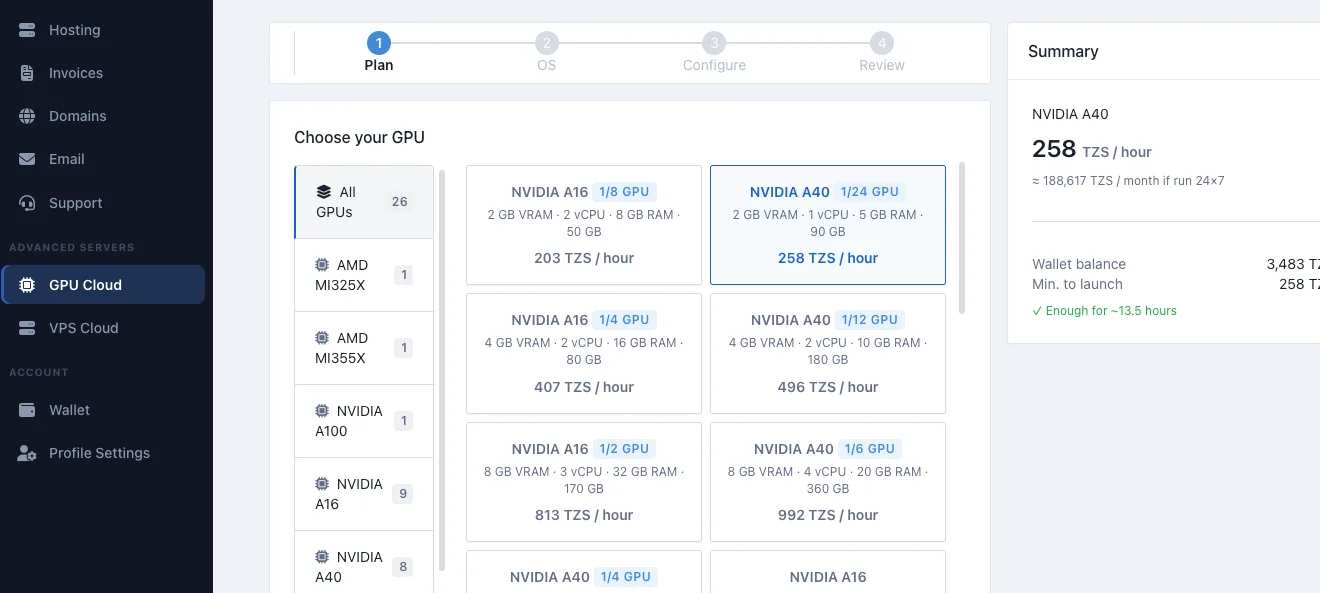
Filter and select the right card
On the left, Momo Cloud shows a filter list for available GPU families, including All GPUs and options such as AMD MI325X, AMD MI355X, NVIDIA A100, NVIDIA A16, NVIDIA A40, and NVIDIA B200. Use the filter to narrow the list if you already know the family you want.
In the example flow, the selected plan is NVIDIA A40 1/24 GPU. Similar plans can differ only by GPU fraction, so make sure the card you intend to use is visibly highlighted before moving forward.
Read the full plan details and summary
Do not choose a plan by GPU name alone. For the selected NVIDIA A40 1/24 GPU example, the visible card details are:
- VRAM:
2 GB VRAM - CPU:
1 vCPU - Memory:
5 GB RAM - Storage:
90 GB disk - Price:
258 TZS / hour
The Summary panel on the right updates to match your selection. In the example, it shows 258 TZS / hour, an approximate monthly figure of about 188,617 TZS / month if run 24×7, a wallet balance of 3,483 TZS, a minimum to launch of 258 TZS, and an estimated runway of about 13.5 hours.
Tip: Match the plan to the job you need to run today. If you are validating access, installing packages, or testing a small model, a smaller plan can save money while you confirm the workflow end to end.
Step 2: Select the operating system
Next, move to the OS step and choose the Linux image Momo Cloud will install on the instance.
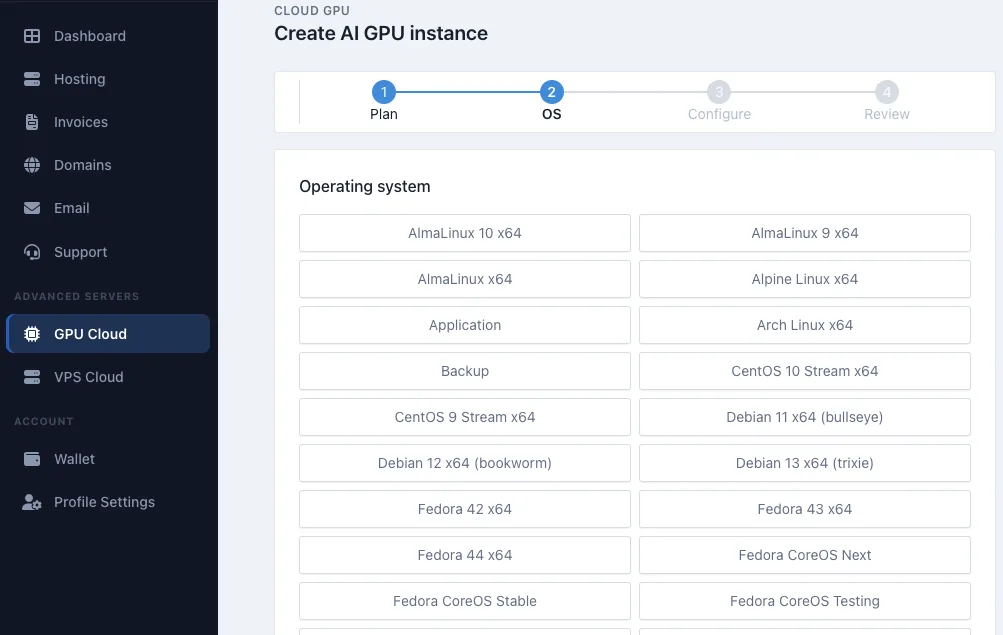
Review the available images
The screenshot shows a broad list of Linux options, including AlmaLinux 10 x64, AlmaLinux 9 x64, AlmaLinux x64, Alpine Linux x64, Arch Linux x64, CentOS 10 Stream x64, CentOS 9 Stream x64, Debian 11 x64, Debian 12 x64, Debian 13 x64, Fedora 42 x64, Fedora 43 x64, Fedora 44 x64, and several Fedora CoreOS variants. For a standard fresh GPU server build, focus on the operating system images unless you specifically intend to deploy from another image source shown in the interface.
Choose the image that best fits your workload and software stack. Debian-based and Ubuntu-based environments are common for AI tooling and developer workflows, while AlmaLinux, CentOS Stream, and Fedora may fit teams with different standards.
Verify the OS again on the Review step
One important detail: the screenshot clearly shows the list of available operating system tiles, but it does not clearly show the final click on a specific OS choice. Later, the created instance overview shows Ubuntu 24.04 LTS x64 as the installed OS. For that reason, always verify the OS again before launch.
Warning: Before you click Create instance, confirm that the OS field on the review page matches your intended image exactly. If you deploy with the wrong operating system, you may need to rebuild or reinstall the instance.
Step 3: Configure hostname, networking and access
The Configure step is where you name the instance, review the optional service toggles, and set up access details.
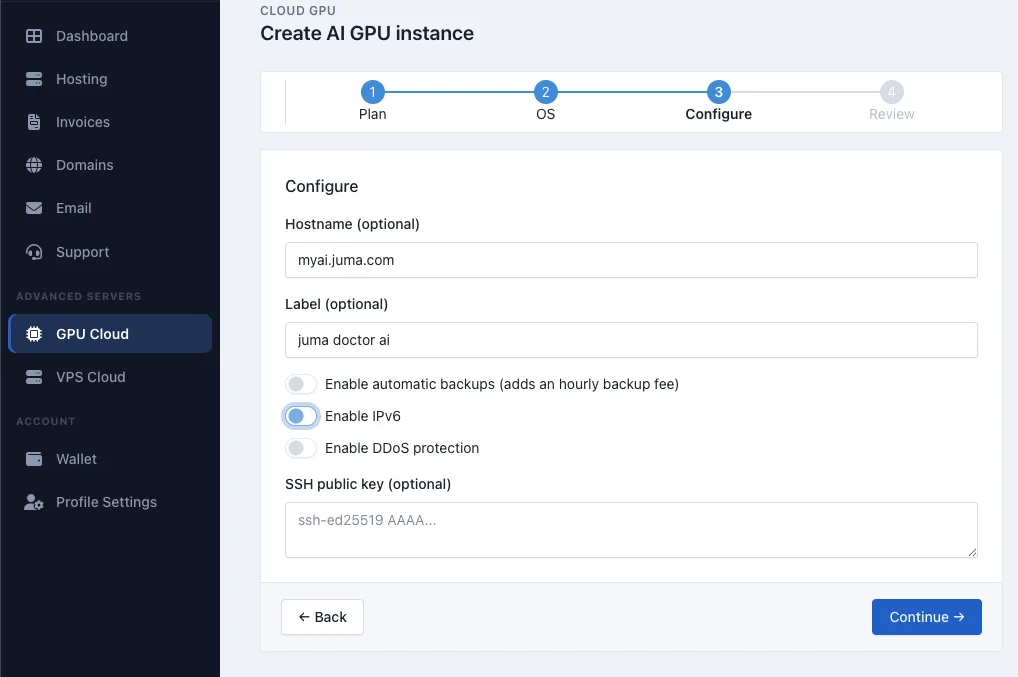
Set the hostname and label
The example hostname is myai.juma.com and the example label is juma doctor ai. A meaningful hostname helps with DNS, SSH prompts, and monitoring, while a label gives you a human-friendly description inside the client area.
Review the optional toggles
The visible toggles are Enable automatic backups, Enable IPv6, and Enable DDoS protection. In the screenshot for this step, IPv6 appears enabled, while automatic backups and DDoS protection appear disabled. Check them carefully instead of assuming they match a default you expect.
The backups option is explicitly noted as adding an hourly backup fee, so treat it as a billing-affecting setting. Whether IPv6 or DDoS protection should be enabled depends on your workload and exposure.
Paste an SSH public key if you want key-based login
The SSH public key field is optional. If you plan to use it, paste the public key, not the private key. Valid formats usually begin with ssh-ed25519 or ssh-rsa.
ssh-ed25519 AAAAC3NzaC1lZDI1NTE5AAAA...ssh-rsa AAAAB3NzaC1yc2EAAAADAQABAAABAQ...
If you already have a local key pair, common public key file paths are ~/.ssh/id_ed25519.pub or ~/.ssh/id_rsa.pub. On Linux or macOS, you can print an existing public key with:
cat ~/.ssh/id_ed25519.pubThen copy the full single-line output and paste it into the Momo Cloud form.
Tip: Treat these settings as part of the final service design, not just setup convenience. Backup and protection options can affect both your running cost and how you operate the instance later.
Step 4: Review billing details and create the instance
The Review step is your final checkpoint before Momo Cloud starts provisioning the GPU instance. Slow down here and confirm that the summary matches what you selected.
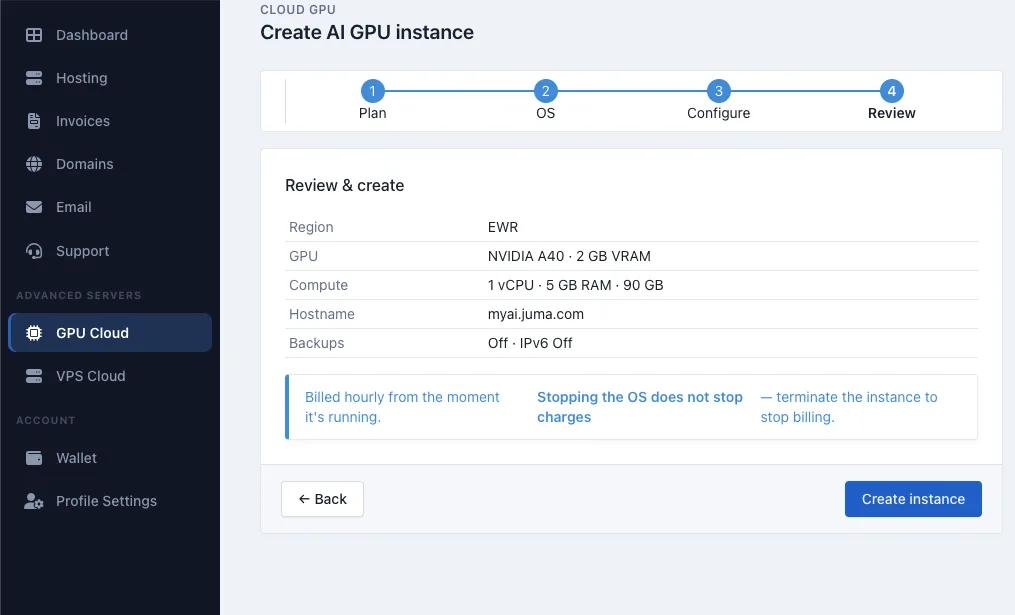
Verify the launch summary
In the example, the review panel shows:
- Region:
EWR - GPU:
NVIDIA A40 - 2 GB VRAM - Compute:
1 vCPU / 5 GB RAM / 90 GB - Hostname:
myai.juma.com
The feature summary shown in the screenshot reads Backups Off · IPv6 Off. Treat this as the final confirmation of what will be provisioned. If the configuration screen and review screen seem to disagree, trust the review page and go back to correct anything that is wrong.
Understand billing and the difference between stop and terminate
The billing notice explains that the instance is billed hourly from the moment it is running. Just as important, the review page warns that stopping the OS does not stop charges. To stop billing, you must terminate or destroy the instance.
Warning: Do not treat the review page as a formality. If the summary shows the wrong GPU profile, hostname, or feature state, use Back and fix it before you click Create instance.
Once everything looks correct, click Create instance to submit the deployment request.
Wait for deployment and confirm the instance is ready
After submission, Momo Cloud takes you to a deployment status page for the new service. The main task here is to wait for provisioning to finish.
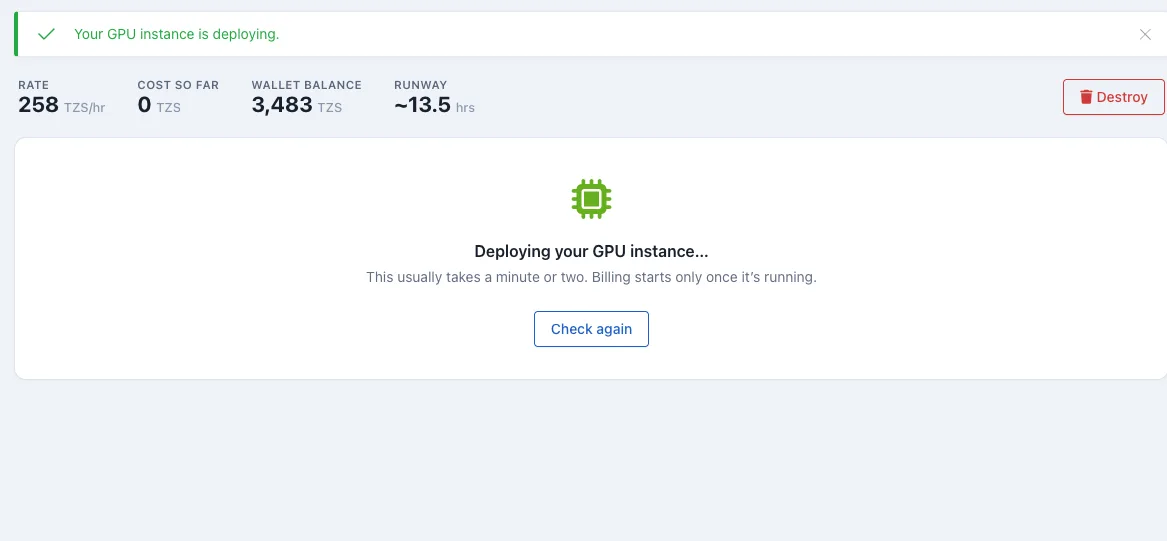
Refresh the deployment status
Use the Check again button to refresh the result. The platform notes that deployment usually takes a minute or two, and billing starts only once the instance is running.
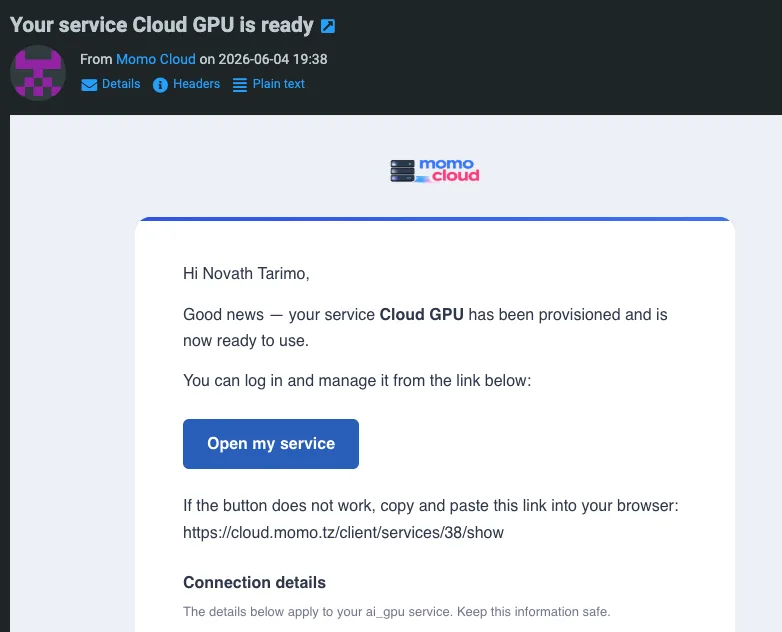
You may also receive an email confirming that the Cloud GPU service has been provisioned and is ready to use.
Tip: Avoid opening multiple tabs or starting another deployment while you wait. Stay on the status page, refresh with Check again, and let the original provisioning task finish cleanly.
Open the instance and review its details
Once provisioning finishes, open the GPU instance page from the completion email or directly from cloud.momo.tz. This is where you confirm that the service is really ready and note the details you will need next.
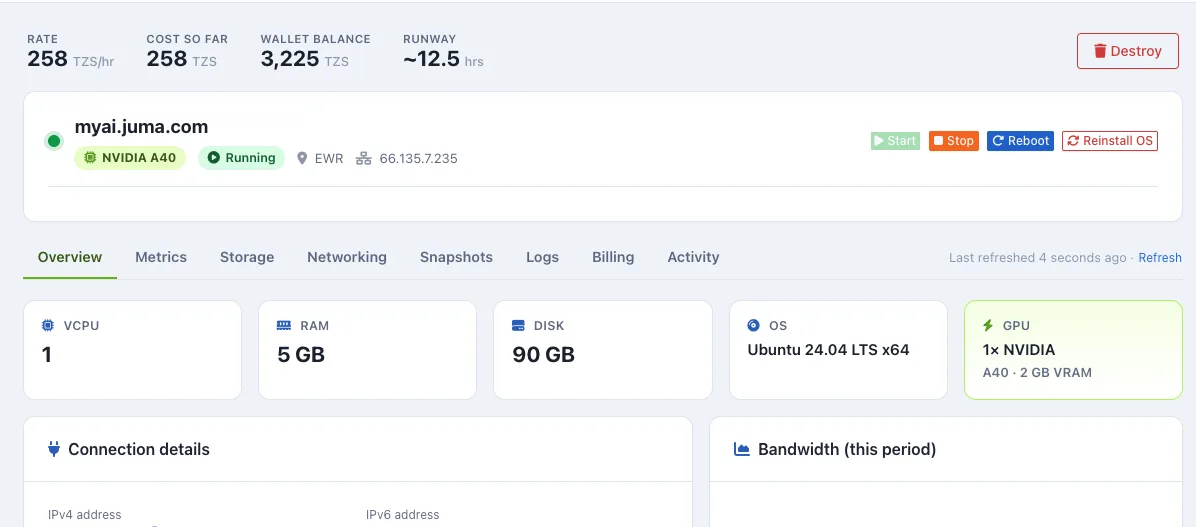
Confirm the instance is running
Near the top of the overview page, the service should show Running. You should also see management actions such as Start, Stop, Reboot, Reinstall OS, and Destroy.
The summary cards in the example show:
- vCPU:
1 - RAM:
5 GB - Disk:
90 GB - OS:
Ubuntu 24.04 LTS x64 - GPU:
1x NVIDIA A40withA40 - 2 GB VRAM
Also note the region and the assigned public IPv4 address. In the example, the public IPv4 is 66.135.7.235. That is the address you would typically use for SSH access and testing until you later add DNS.
Record the instance details
Before you begin deeper setup, save the key values somewhere you can find them again. A simple note like this is often enough:
Hostname: myai.juma.com
Public IP: 66.135.7.235
Region: EWR
GPU plan: NVIDIA A40
Billing rate: 258 TZS/hr
OS: Ubuntu 24.04 LTS x64
Carry out your normal post-deployment setup
Once the instance details look correct, move on to your standard server preparation. At a high level, that usually means connecting over SSH, installing updates, checking that the GPU is visible inside the OS, and then preparing your application stack.
Examples from the guide include:
ssh root@66.135.7.235ssh ubuntu@66.135.7.235apt update && apt -y upgradenvidia-smiIf you need to add or review your SSH key format, a typical public key entry looks like this:
ssh-ed25519 AAAAC3NzaC1lZDI1NTE5AAAAIExampleKeyMaterialHere user@laptopWarning: Stop and Destroy are not the same thing. Stopping turns the instance off, while destroying removes it entirely. If you are finished and want billing to end, terminate the instance instead of leaving it allocated.
Common mistakes to avoid
Starting with too little balance
Check both the minimum launch amount and the runway estimate before you create the instance. For GPU workloads, being able to start the instance is not the same as being able to run the full job.
Choosing a plan by GPU name alone
Always read the full plan card. The GPU model matters, but so do VRAM, vCPU, RAM, disk size, and the hourly rate.
Skipping the final review
Do not rely on memory when moving through the wizard. Re-check the region, GPU, compute details, hostname, backups state, and IPv6 state on the Review page. This is especially important because the example screenshots show a possible mismatch between the Configure view and the final review for IPv6.
Assuming a stopped OS stops billing
The review screen is clear: stopping the operating system does not stop charges. If the instance is temporary, make termination part of your cleanup checklist as soon as the job is finished and any needed data has been backed up or downloaded.
Skipping hostname, SSH key, or deployment notes
Small details matter later. A clear hostname, an SSH public key prepared in advance, and a short record of the instance IP, OS, region, and plan can save time when you return to the server or hand it over to someone else.
Warning: When the Configure and Review screens seem to disagree, use the Review & create page as your final checkpoint and confirm every important setting there.
Need help from Momo Cloud?
If you get stuck while creating or managing a GPU instance, contact Momo Cloud support early. They can help you check whether the selected plan fits your workload, whether your wallet balance is enough to launch, whether the service is still deploying or already running, and whether access or networking settings match what you intended.
When you reach out, include the instance name or hostname, the selected region, the current status you see, any visible error message, and what you were trying to do at the time. Exact details make troubleshooting faster.
If you are ready to launch, sign in to cloud.momo.tz, open GPU Cloud, and step through the wizard carefully. A few extra checks on plan size, wallet runway, and the final review screen can save both time and cost once your GPU instance goes live.
Gallery