Your domain is more than a web address. It is the name people use to find your website, send email to your business, and recognize your brand online. This guide walks through the full Momo Cloud flow for registering a domain and managing it afterward in the client area at cloud.momo.tz, using myfirstsite.co.tz as the example throughout.
Where a screen is not fully shown in the provided images, such as the final payment method step or the detailed DNS record editor, this walkthrough stays practical and precise without guessing at interface labels. The goal is to help you complete the process confidently while avoiding mistakes that can delay setup.
What Domain Registration Means
A domain name is the address people type into a browser to reach your site, such as myfirstsite.co.tz. It is the human-friendly identity for your website, email, and other internet services.
Registering a domain does not give you permanent ownership after one payment. It reserves the name for a fixed term. In the example shown in this guide, the registration period is 1 Year, which means the domain is reserved for one year and must be renewed before expiry if you want to keep using it.
It also helps to separate domain registration from hosting. The domain gives you control of the name. Hosting provides the server or platform where your site or email actually runs. The connection between the two is controlled by nameservers and DNS records.
- If nameservers point to a DNS provider, that provider answers DNS queries for the domain.
- If an
Arecord pointsmyfirstsite.co.tzto your VPS IP, web traffic goes to that server. - Mail records can point email to a different provider from the one hosting the website.
Availability is also time-sensitive. A domain can only be registered if it is available at the moment you search. If someone else registers it first, you will need to choose another name or extension.
Tip: If a newly registered domain does not open your website straight away, that usually does not mean registration failed. More often, it means the nameservers or DNS records still need to be set correctly.
Before You Start
A little preparation makes domain registration much smoother. Before you begin, have a preferred name, a backup option, accurate account details, funds ready for the invoice, and a basic plan for whether you will use default or custom nameservers.
Prepare more than one domain idea
Your first choice may already be taken, so it helps to have a backup ready. If your first option is myfirstsite.co.tz, you might also prepare alternatives such as myfirstsiteonline.co.tz or another variation that still fits your brand.
- Choose names that are easy to spell, type, and say aloud.
- Avoid unnecessary hyphens or overly long names.
- Pick something you will be comfortable using in email addresses and invoices later.
Use accurate account and contact details
The account used for the order matters because it affects billing, renewals, and domain management later. Make sure your name or business name is correct, your phone number is accurate, and the email address on the account is one you actively monitor.
Keep payment ready
Once the order is created, you will be shown an invoice for the registration. In the example used throughout this guide, the amount for a .co.tz registration is TZS 25,000.00. Being ready to pay without delay helps reduce the risk of losing an available name while the order is still incomplete.
Decide how you want to handle nameservers
In most cases, you will either keep the platform's default nameservers or switch to custom nameservers from another provider.
- Default nameservers are usually the simplest choice when you want straightforward management from the same platform.
- Custom nameservers are used when DNS will be managed somewhere else.
Tip: Use an email address you or your business control directly. Renewal notices and account alerts only help if they reach the right person.
Start Your Search on Momo Cloud
You can begin from the Momo Cloud homepage or from the dedicated Domains page. The homepage gives you a quick search box, while the Domains page is designed specifically for registration and transfer tasks.

Use the homepage search box
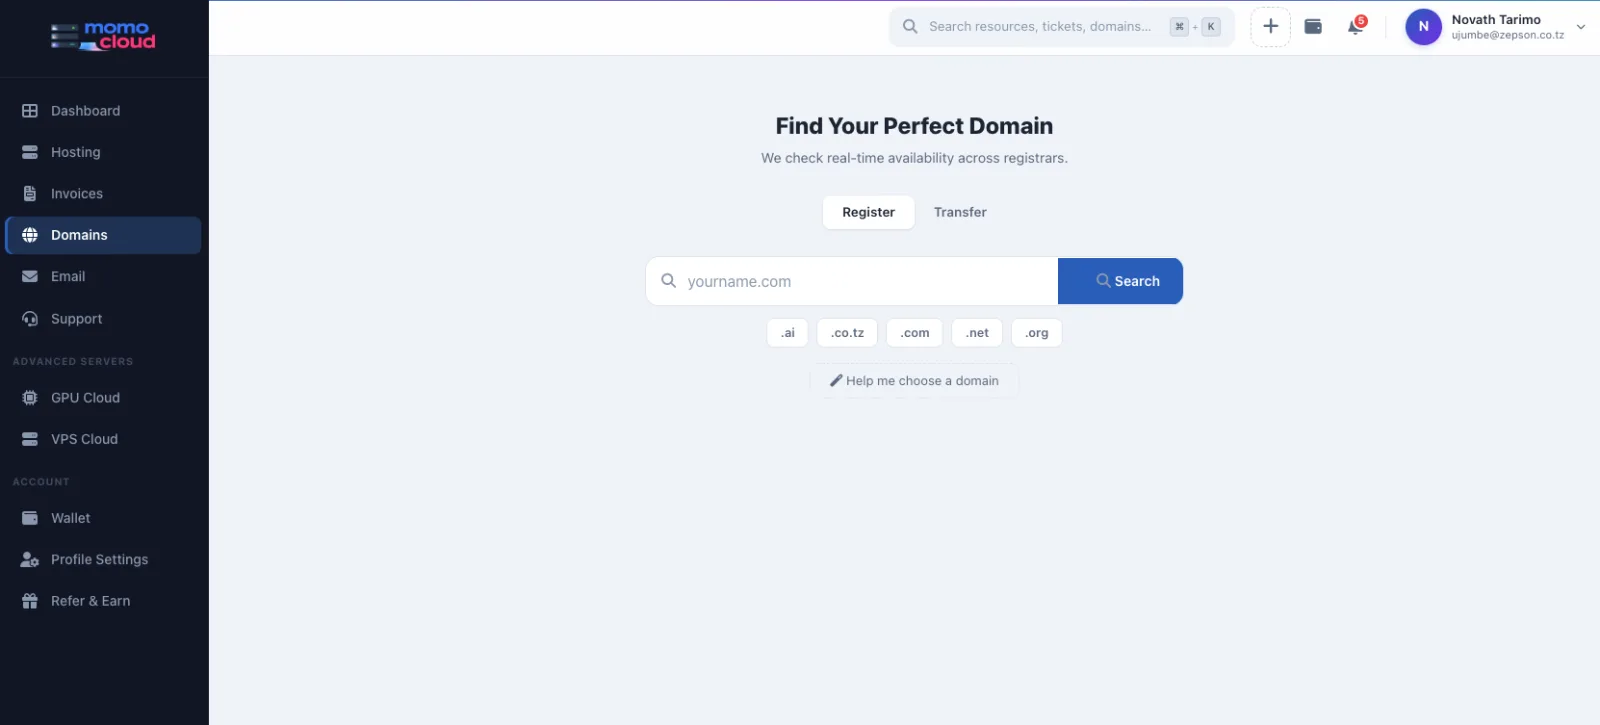
On the homepage, the main banner includes a domain search field labeled with text such as Find your perfect domain name.... If you already know what you want, type the name there and click Search.
Just below the search bar, the page also highlights popular extensions and example yearly pricing, including .co.tz TZS 25,000/yr, .or.tz TZS 25,000/yr, .ac.tz TZS 25,000/yr, and .com TZS 32,000/yr. That gives you a quick sense of common options before you search.
Use the Domains page for a focused search
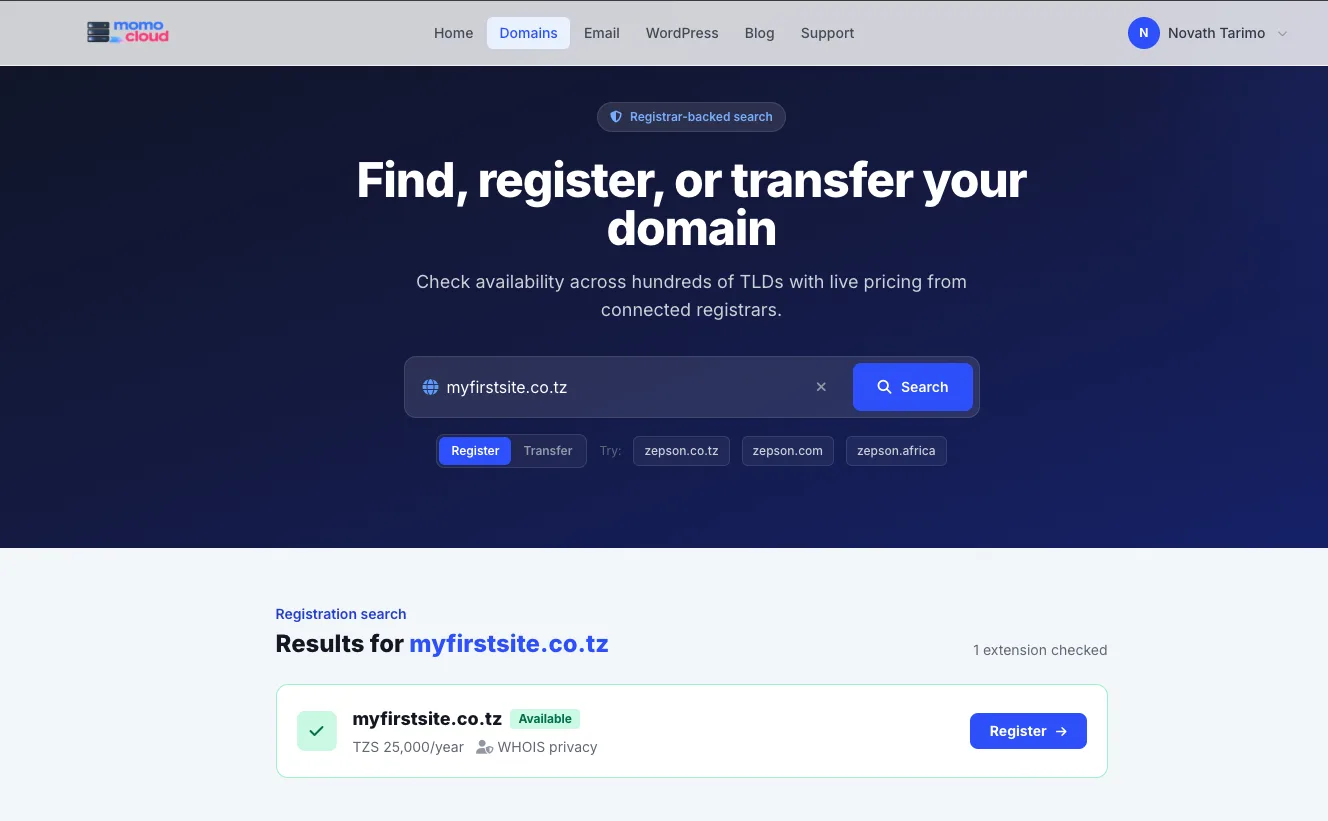
If you want the dedicated search flow, open the Domains page from the main navigation. The heading there reads Find, register, or transfer your domain, confirming that you are in the right place to start a new registration.
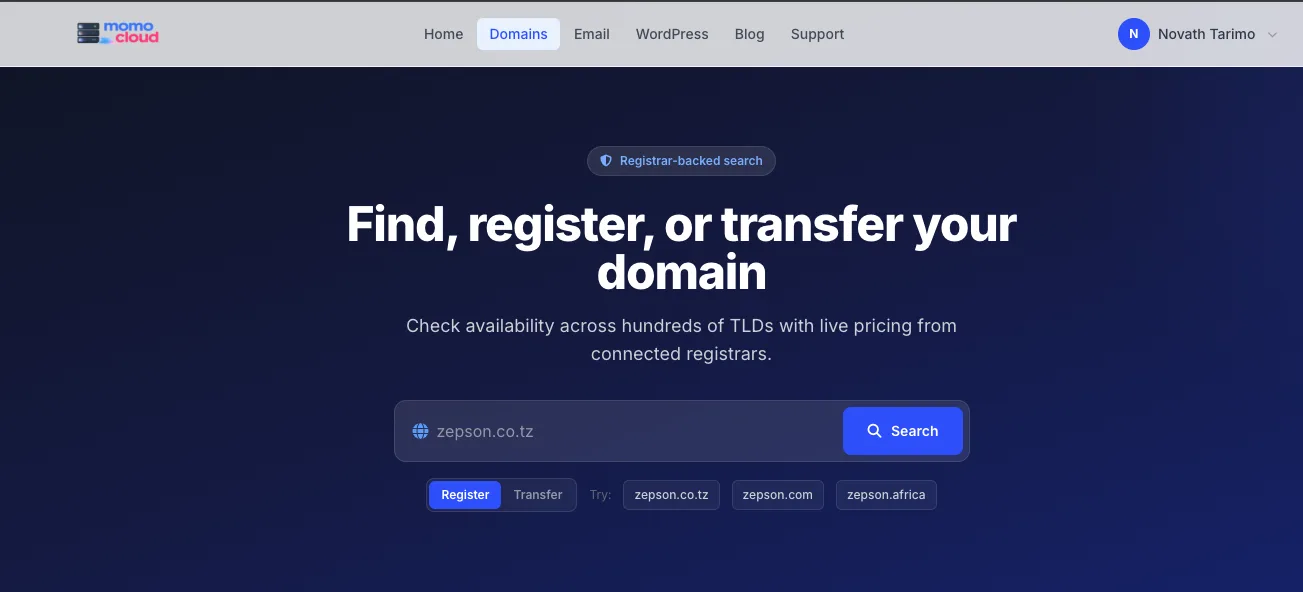
Choose the correct tab
Stay on the Register tab if you are buying a brand-new domain. The Transfer tab is for moving an existing domain from another registrar to Momo Cloud.
If you are already signed in at cloud.momo.tz, you may also see a search view inside the client area. The layout is different, but the action is the same: enter the full domain name and search for live availability.
Tip: Before you click Search, make sure Register is selected. Using Transfer by mistake can send you into the wrong workflow.
Search for Your Domain and Check Availability
Enter the exact domain you want, including the extension. For this walkthrough, type myfirstsite.co.tz rather than just myfirstsite. That checks availability for the specific name you intend to buy.
After you click Search, review the results carefully. The page should show a heading similar to Results for myfirstsite.co.tz, confirming the lookup was performed for the correct name.
Confirm the result details
For a successful search, the result card should show:
- the exact domain name:
myfirstsite.co.tz - the status:
Available - the visible price:
TZS 25,000/year
If those details look correct, click Register to move into the order flow.
Tip: Seeing an available result is not the same as starting an order. You must click Register on the exact domain you want.
Sign In and Review the Registration Order
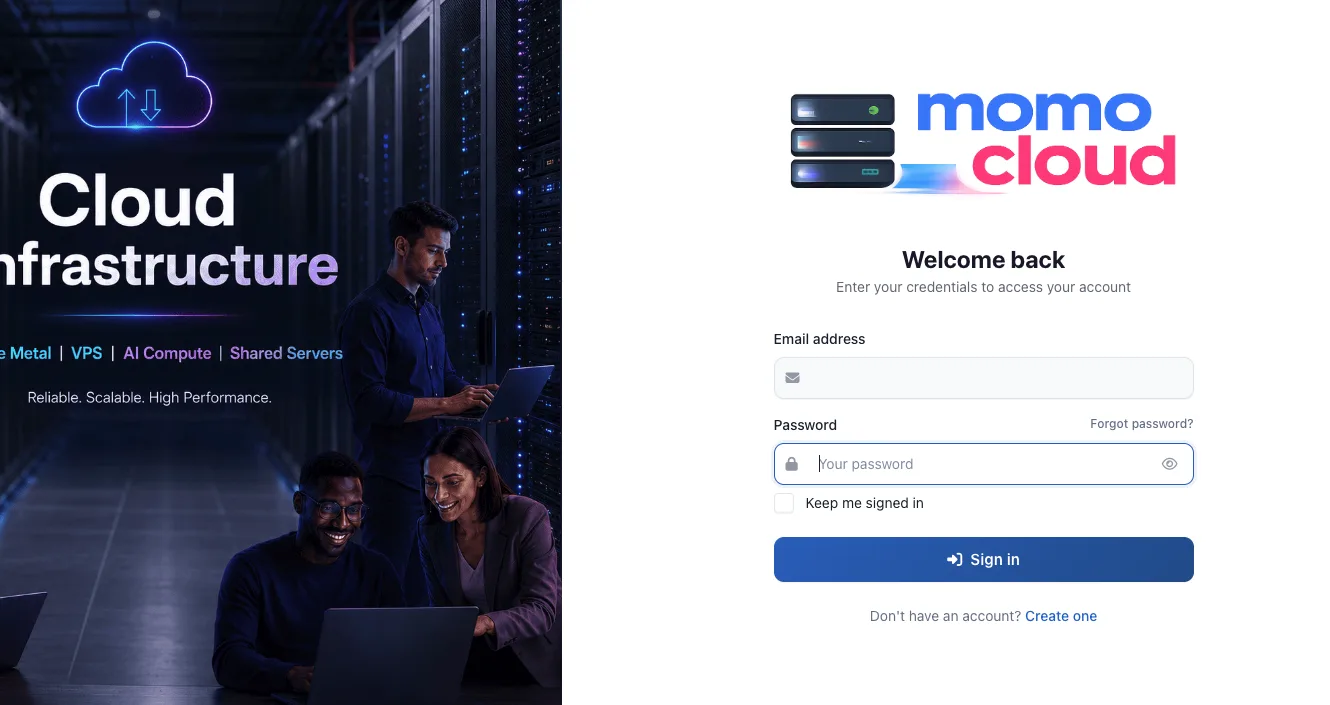
After clicking Register, you may be taken straight to the order page or asked to sign in first. The screenshots do not show the login or account creation form itself, but the later screens clearly appear inside the Momo Cloud client area, which means the registration is tied to a customer account.
If you already have a Momo Cloud account, it is best to use the same one you use for your other services so your domains, invoices, and management settings stay in one place. If you are new, complete the on-screen account creation step and continue to the order review.
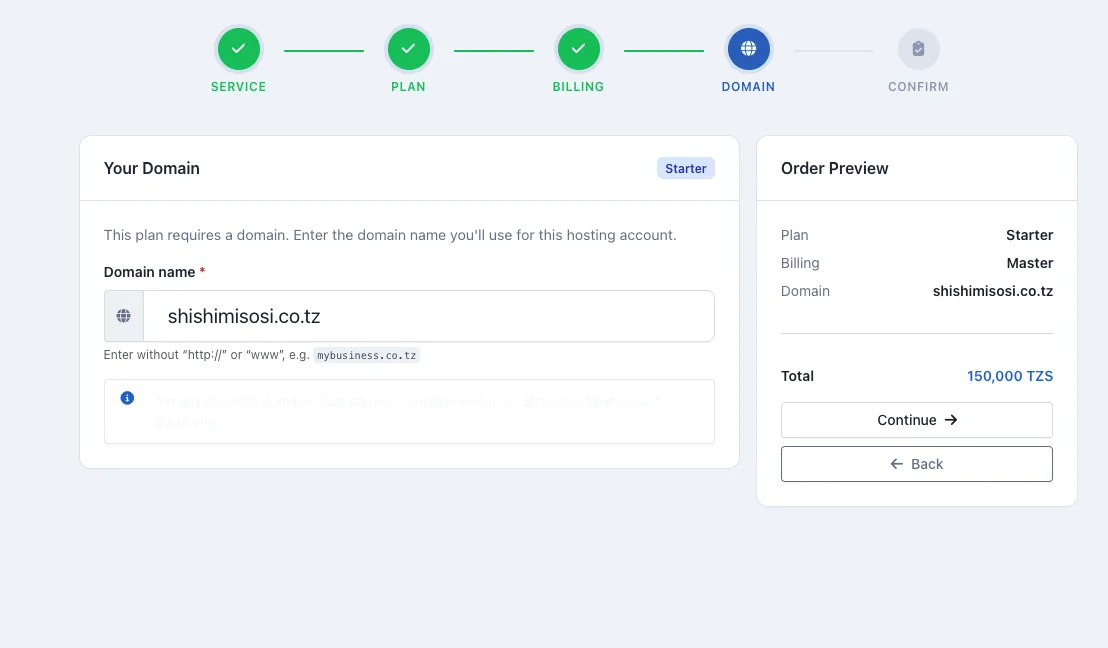
Check the order details carefully
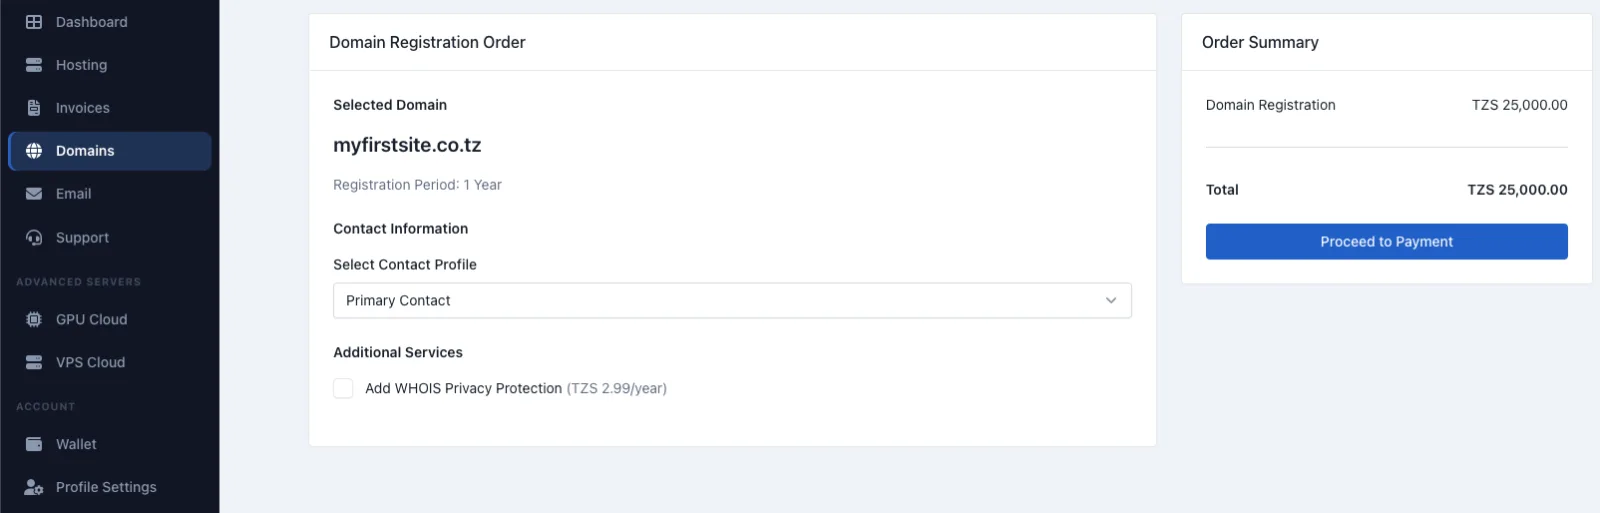
On the Domain Registration Order page, confirm the following:
- Selected Domain:
myfirstsite.co.tz - Registration Period:
1 Year - Contact Profile: the correct profile, such as
Primary Contactif that is the right one
The page also shows an optional add-on under Additional Services: Add WHOIS Privacy Protection at TZS 2.99/year. If you want it, select it before continuing. If not, leave it unselected.
In the Order Summary panel, the example shows:
Domain Registration:TZS 25,000.00Total:TZS 25,000.00
Once the domain, term, contact profile, and any optional add-ons are correct, click Proceed to Payment.
Tip: If your account has more than one saved contact, double-check the selected profile before checkout. It is much easier to get this right now than after registration.
Review the Invoice and Complete Payment
After proceeding from the order page, Momo Cloud opens an invoice for the domain registration. This is your last clear billing check before payment.
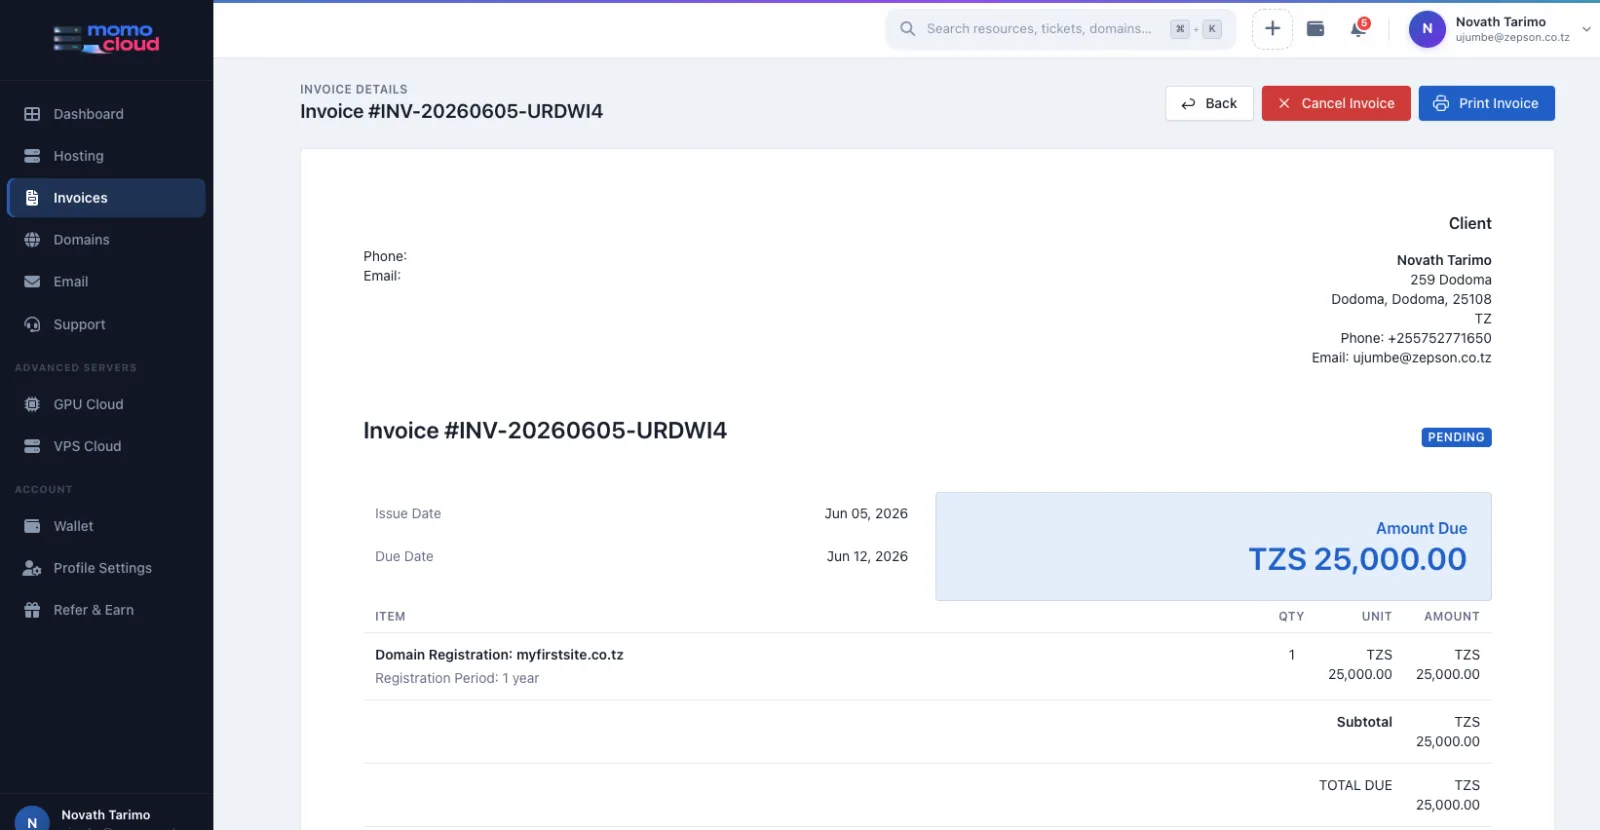
In the example shown, the invoice includes:
Invoice #INV-20260605-URDWI4Issue Date:Jun 05, 2026Due Date:Jun 12, 2026Status:PENDING
Confirm the billed item
The itemized charge reads Domain Registration: myfirstsite.co.tz with Registration Period: 1 year. The amount due is shown as TZS 25,000.00, matching the order summary when no optional service has been added.
Use the invoice actions if needed
The page also shows action buttons such as Back, Cancel Invoice, and Print Invoice, which are useful for review and record-keeping.
The screenshot does not show the actual payment method selection or payment button. In practice, you should expect the next step to involve choosing a payment method or continuing to a payment interface. Once payment is successful, the domain should appear in your domain management area.
Tip: Compare the invoice total with the earlier Order Summary. If the amount is different and you were not expecting a change, review the order before you pay.
Access the Domain Dashboard After Purchase
After payment is confirmed and the registration is processed, open the domain in the Momo Cloud client area. This is where you stop looking at billing screens and start managing the live domain itself.
What to verify first
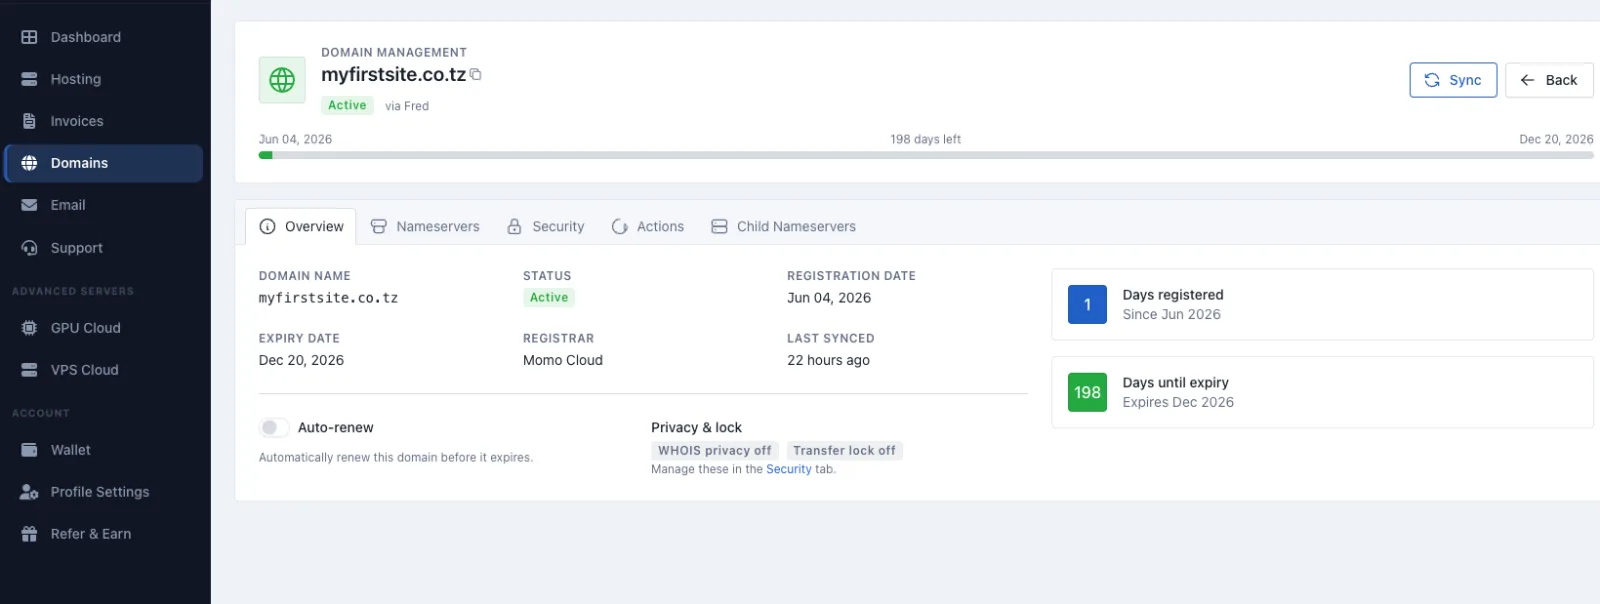
On the overview page for myfirstsite.co.tz, confirm that the domain status is Active. That is the state you want to see after a successful registration.
The page also shows core details such as:
- Registrar:
Momo Cloud - Registration date
- Expiry date
- Last sync
These details help confirm that the correct domain was registered, that the term was applied properly, and that the dashboard is showing current information.
Know the available tabs
The domain page includes tabs such as Overview, Nameservers, Security, Actions, and Child Nameservers. Together, these cover the main post-purchase tasks:
Overviewfor status, dates, renewal, and a security summaryNameserversfor DNS delegationSecurityfor privacy and lock settingsActionsfor operational domain tasksChild Nameserversfor private nameserver setup if needed
Check renewal and security status
The overview also includes an Auto-renew control and a summary for items such as WHOIS privacy and transfer lock. These are worth checking immediately so you know how the domain will be maintained and protected over time.
Tip: If the domain does not appear immediately after payment, refresh the domain list and re-open the record. Registration and synchronization can take a short time just after a new order is completed.
Manage DNS Records
Once the domain is active, the next job for most owners is DNS. This is what determines where your website, email, and verification records point.
The screenshots do not show a DNS zone editor for managing records such as A, AAAA, CNAME, MX, or TXT. Because of that, this guide does not assume a specific menu path for editing records. What matters is understanding where those records should be changed.
Nameservers and DNS records are different
Nameservers decide which DNS service is authoritative for the domain. DNS records are the actual entries stored inside that authoritative DNS service.
- Nameservers answer: “Who manages DNS for this domain?”
- DNS records answer: “What should this domain do?”
Typical DNS records include:
Arecords for website IP addressesCNAMErecords for aliases such aswwwMXrecords for mail routingTXTrecords for SPF, verification, and similar requirements
Tip: Before changing any DNS record, check which nameservers are active. If you edit records in the wrong DNS provider, the live domain will not use them.
Where to edit records
If the domain is using the default nameservers, the authoritative DNS zone is usually hosted on that default service. If the domain is using custom nameservers, record changes must be made at the external provider operating those nameservers.
For example, if your Momo Cloud VPS has the public IP 197.248.10.25, a common website setup might use:
- an
Arecord formyfirstsite.co.tzpointing to197.248.10.25 - a
CNAMErecord forwww.myfirstsite.co.tzpointing tomyfirstsite.co.tz
If you use a hosted mail platform, that provider will normally give you the exact MX and TXT values to add in the authoritative DNS zone.
| Scenario | Where nameservers point | Where you edit DNS records |
|---|---|---|
| Domain uses default nameservers | Registrar or platform DNS service | In the authoritative DNS zone provided by that service |
| Domain points to third-party DNS | External provider nameservers | In that external provider's DNS dashboard |
| Domain uses private child nameservers | Your own nameserver hostnames | In the DNS system running behind your private nameservers |
Wherever you edit records, verify that the hostname, record type, and value are correct, avoid conflicting records, and allow time for propagation after making changes.
Update Nameservers
If you want to move DNS authority to another provider, do it from the Nameservers tab. This changes which DNS system is authoritative for the domain.
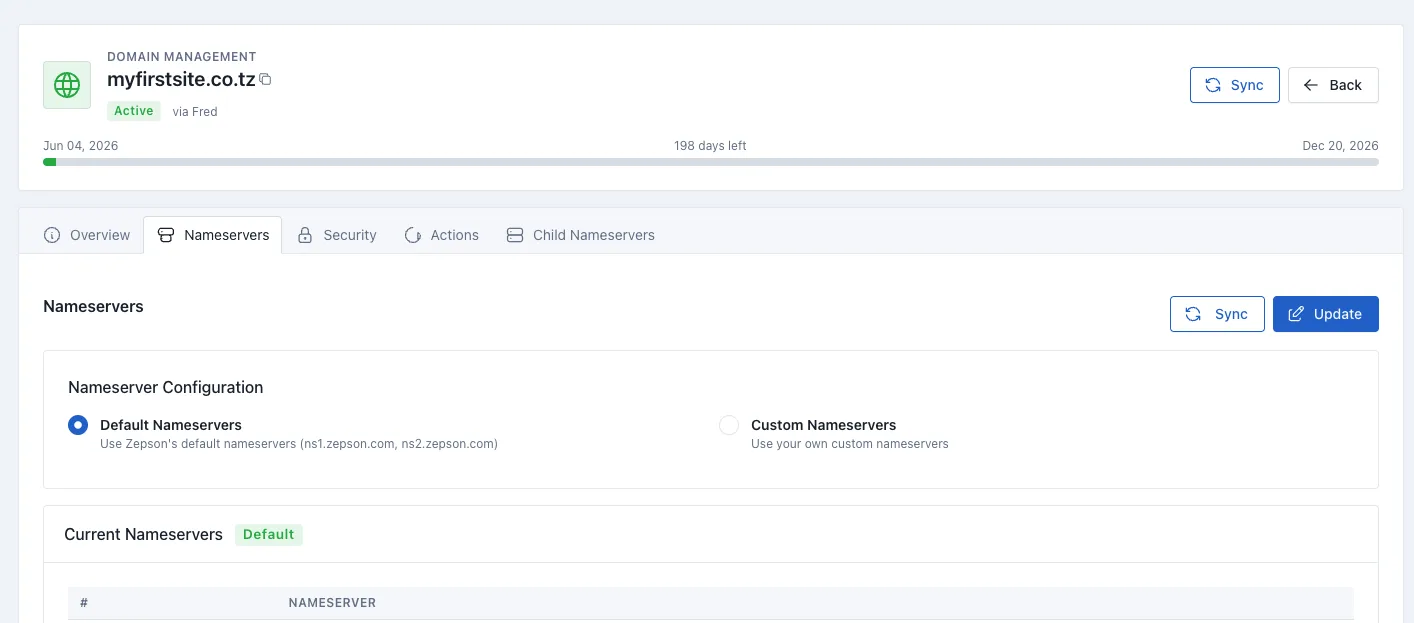
Choose default or custom nameservers
The page shows two options: Default Nameservers and Custom Nameservers. In the screenshot, the default set shown is ns1.zepson.com and ns2.zepson.com.
- Keep
Default Nameserversselected if you want DNS to remain with the platform default shown in the panel. - Choose
Custom Nameserversif another DNS provider should manage the domain.
Use Current Nameservers to confirm what is live
The Current Nameservers section helps you verify what the domain is actively using. This is especially useful after a recent change or when troubleshooting why DNS records are not behaving as expected.
Save with Update, then recheck with Sync
After making a change, use Update to save it. Then, if needed, use Sync to refresh the displayed information and confirm that the panel is showing the latest known state.
You normally change nameservers only when you are moving DNS authority from one provider to another. If you only need to point the site to a new IP or add mail records, you may only need to edit DNS records in the current authoritative zone instead.
Tip: When switching to Custom Nameservers, copy the hostnames exactly as provided and enter all required nameservers. A typo can leave the domain unreachable until corrected.
Manage Renewal and Protect the Domain from Expiry
Once nameservers and DNS are in order, the most important routine task is making sure the domain does not expire unexpectedly. The overview page brings together the settings you need for this: status, expiry date, days remaining, renewal control, and basic security indicators.
Use the Auto-renew control
For most business or production domains, enabling Auto-renew is the safest option. It helps reduce the chance of losing the domain because a renewal invoice was missed.
Watch the expiry information
Even if auto-renew is enabled, still check the expiry date and the remaining days shown in the dashboard. These give you a quick health check on the registration and help you catch billing or synchronization issues early.
Review privacy and transfer-lock indicators
The overview also provides a quick summary for privacy and transfer lock, with a note that these can be managed from the Security tab. These settings are part of protecting the domain over time, especially for important business names.
Keep account details current
Renewal only works smoothly when the billing and contact details on the account are up to date. Make sure invoices and reminders go to an email address that is monitored by the right person or team.
Tip: Treat Auto-renew as the default for any important domain, and still keep your billing contact details current so renewal notices do not get missed.
Optional: Set Up Child Nameservers
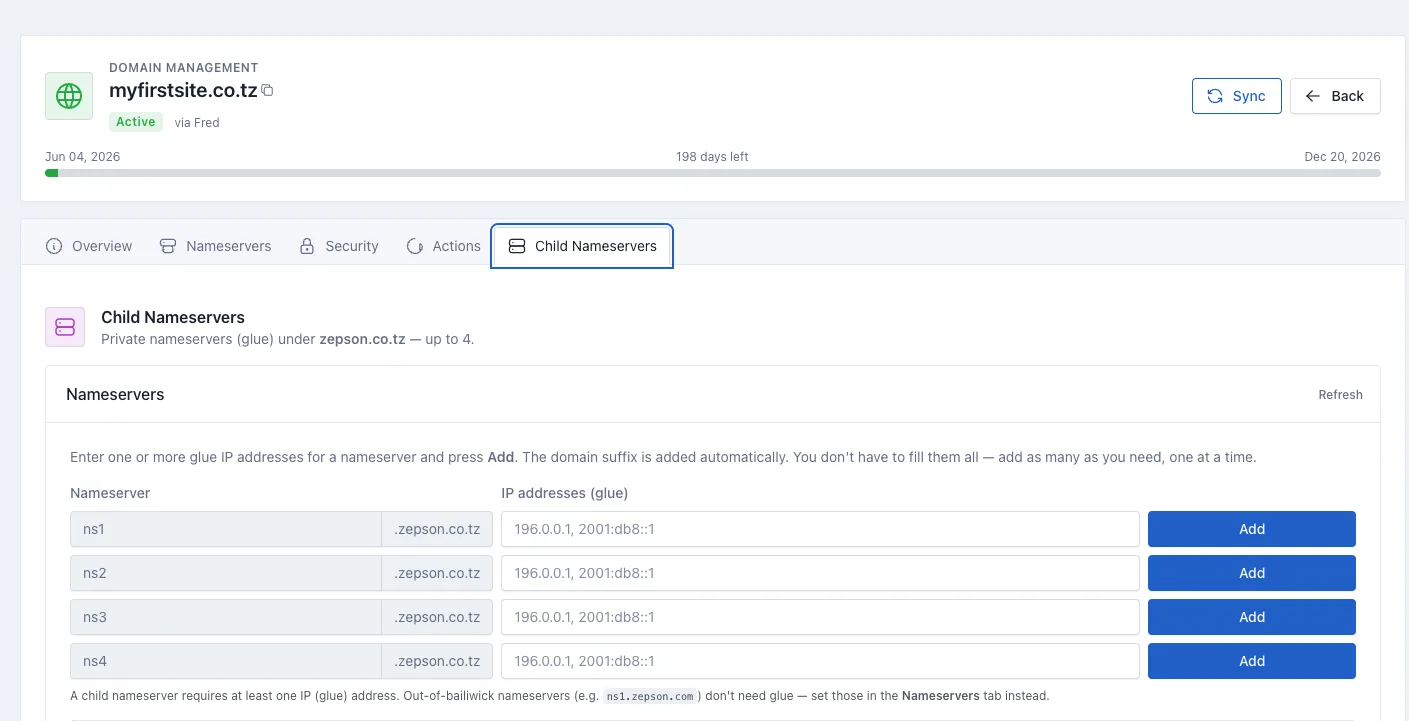
If you want branded nameservers such as ns1.example.co.tz and ns2.example.co.tz, use the Child Nameservers tab. This is an advanced feature used to create private nameservers, also called glue records.
How it works
A child nameserver is a nameserver hostname inside the same domain. For example, if your domain is example.co.tz, then ns1.example.co.tz and ns2.example.co.tz are child nameservers.
The form provides short host labels such as ns1, ns2, ns3, and ns4. The domain suffix is added automatically, so entering ns1 under example.co.tz creates ns1.example.co.tz.
Each child nameserver must have at least one glue IP address. Without an IP address, resolvers have no reliable way to find the server behind that hostname.
When to use it
This setup is useful if you run your own DNS on a VPS or want white-label nameservers for customer hosting. A typical flow is:
- Create
ns1and add the first glue IP address. - Create
ns2and add the second glue IP address. - Then go to the normal
Nameserverstab and point the domain tons1.yourdomain.tldandns2.yourdomain.tld.
Do not use this tab for out-of-bailiwick nameservers such as ns1.zepson.com. External hostnames like that belong in the regular Nameservers tab instead.
Warning: Only create child nameservers when the IP addresses already belong to DNS servers you control and have configured correctly. Publishing private nameservers without working DNS behind them can break resolution.
Common Mistakes to Avoid
Most domain issues come from small, avoidable mistakes rather than major technical failures. The most common ones are:
- Using
Transferinstead ofRegisterwhen trying to buy a new domain - Seeing an available result but not actually clicking
Registerto start the order - Skipping the order review and missing a typo in the domain or extension
- Mixing up nameservers and DNS records
- Forgetting to check renewal settings and expiry tracking
A simple rule helps with the biggest source of confusion: if you are changing where DNS is hosted, you need the Nameservers tab. If you are changing a record inside the current DNS zone, you need DNS record management in the authoritative provider.
Tip: Before making any change, ask yourself whether you are changing the DNS provider or changing a record inside the current DNS zone. That usually tells you the right place to work.
What Happens Next and Where to Get Help
Once the registration is complete and the domain appears in the Domains area with an Active status, you can connect it to your website, email service, or application by reviewing nameservers, DNS, renewal, and security settings.
If something does not look right, such as the domain missing after payment, uncertainty about where to edit DNS, or confusion over renewal or invoice details, contact Momo Cloud support before making further changes. When you do, include the domain name, the email address on your account, and the invoice number if the issue is billing-related.
Your next step is simple: sign in at cloud.momo.tz, confirm your domain is active, and make the nameserver, DNS, and renewal choices that match how you want the domain to work.
Gallery