Buying hosting for the first time can feel more technical than it needs to be. In Momo Cloud, the Shared Hosting order flow is designed as a guided process: choose the service, pick a plan, add your domain, pay the invoice, and then open your hosting dashboard.
This walkthrough follows the same path shown in the interface, from the Hosting area in cloud.momo.tz to the final service dashboard. If you are new to hosting, the goal is simple: help you know exactly what each screen means and what to click next.
Shared Hosting at a glance
Shared Hosting gives you one place to run a website and manage the everyday tools that go with it. In practical terms, that means a single service where you can connect your domain, upload site files, create email addresses on your domain, manage databases, and open your hosting control panel when you need to make changes.
For example, if you want to launch a business website such as example.co.tz, a shared hosting plan gives you one place to manage the website itself, email accounts like info@example.co.tz, and the storage used by your content. Instead of ordering each part separately, you start with the hosting plan and manage the service from the same area.
What you will see during the order flow
Inside the Momo Cloud client area at cloud.momo.tz, the process appears as a guided order form. You begin in the Hosting area, start a new service order, choose Shared Hosting, compare the available plan cards, select a billing cycle, add the domain name for the hosting account, and confirm the order.
After that, Momo Cloud generates an invoice for the new hosting service. From the invoice page, you choose a payment method and continue to the payment gateway if needed. Once payment is completed successfully, you can return to the client area and open the hosting dashboard for the service.
What this guide covers
This guide is written for beginners, so it stays focused on the labels and buttons you actually see in the interface. You do not need server administration knowledge to follow it. If a screen says Choose Shared Hosting, Select Plan, Continue, or Pay, those are the same labels used in the steps below.
Tip: Before you begin, have your domain name and payment method ready. That small preparation makes the order flow much faster.
Before you start
A few quick checks before you begin can save time later. Since the order flow moves from service selection to invoice creation and payment, the main goal here is to make sure you are signed in to the correct account and ready to confirm the exact service you want.
Sign in to your Momo Cloud customer account
To place a hosting order, you need an active Momo Cloud customer account and you need to be signed in at cloud.momo.tz. The screenshots for this guide begin after login, inside the client area, so the registration and sign-in screens are not shown step by step.
If you are a new customer, create your account first and then return to this guide once you can access the dashboard. If you already have an account, make sure you are signed in to the same profile you want to use for billing and service management, because the hosting service, invoice, and renewal notices will appear under that account.
Have your domain name ready
The order flow shown here requires a domain name before you can confirm the hosting order. You do not choose a plan, pay first, and then decide on the domain later. During the process, you will reach a domain step where you must enter the domain that will be used with the hosting account.
Prepare the exact domain name in advance, such as example.com or mybusiness.co.tz. Enter only the domain itself, not a full address like https://example.com or www.example.com.

Understand when payment happens
In Momo Cloud, payment happens after the service order is created as an invoice, not before. First you choose the service, plan, billing cycle, and domain. Then you confirm the order. After that, the system generates the invoice.
The sequence shown in this guide is:
- Choose the hosting service
- Select the plan
- Choose the billing cycle
- Enter the domain
- Confirm and create the service order
- Open the generated invoice and pay it
Tip: Before paying, review the plan name, billing cycle, domain, and total due carefully. If anything looks wrong, use Back and correct it before the invoice is created.
Step 1: Open the Hosting area
After signing in to your Momo Cloud client area, click Hosting in the left-hand menu. This is the main section for viewing and managing hosting-related services.
It is worth getting familiar with this page early, because it is also where you will return after checkout to review the service status and open its management options.
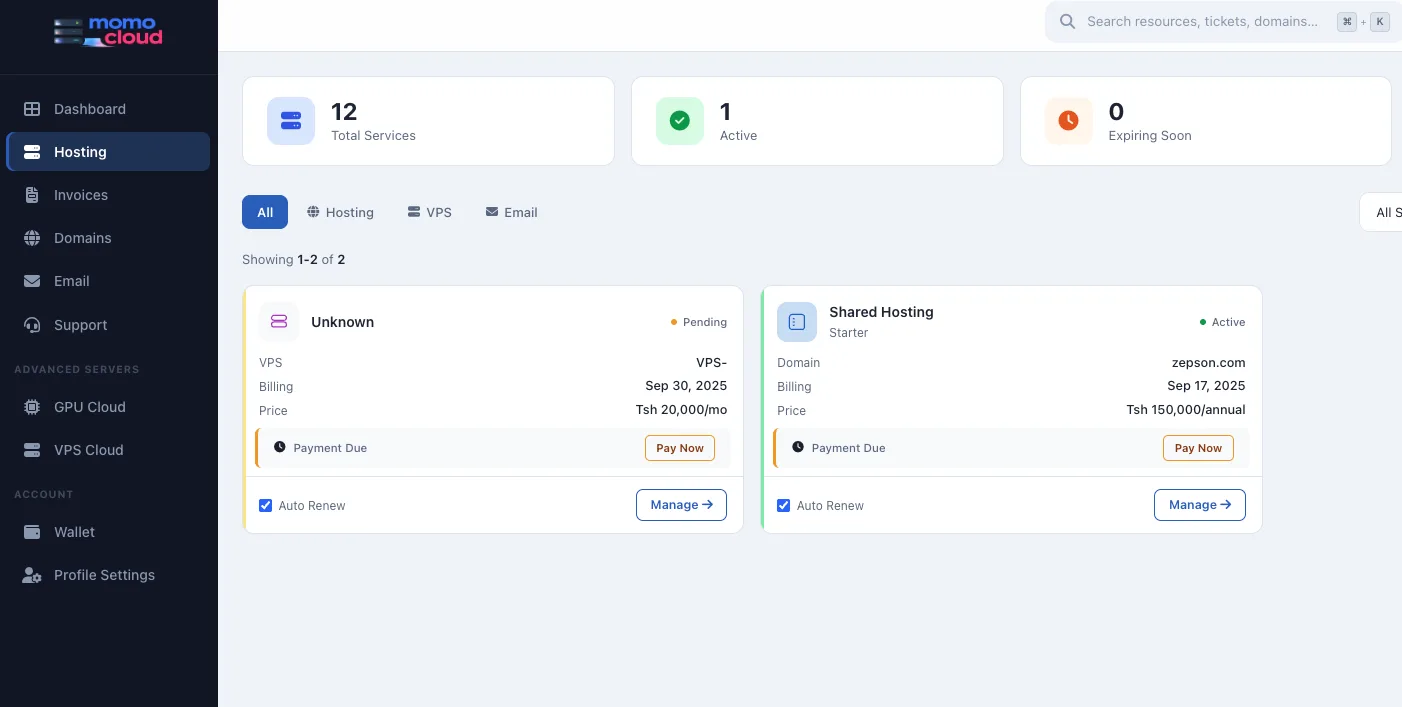
What you see on the Hosting page
At the top of the page, you may see summary cards such as Total Services, Active, and Expiring Soon. Below that is the service list, where each card represents a service in your account.
Status labels are especially useful here. A service may show Active when it is already provisioned and working, or Pending if setup or payment is not yet complete.
Pay Now and Manage
Two buttons matter most on this page once a service exists:
Pay Nowappears when there is an unpaid invoice or payment due for that service.Manageopens the service management view, where you can access details and, after activation, open the hosting dashboard or control panel.
Tip: If you later wonder where to find the hosting account again, return to Hosting. It is the normal starting point for opening the service card and clicking Manage.
Step 2: Start a new order and choose Shared Hosting
Once you enter the standard Order a Service flow, the first screen asks what type of service you want to set up. This is where you choose the product family before you see specific plans.
For this guide, select Shared Hosting. That keeps you on the path for a managed hosting account for a website, without needing to manage a server yourself.
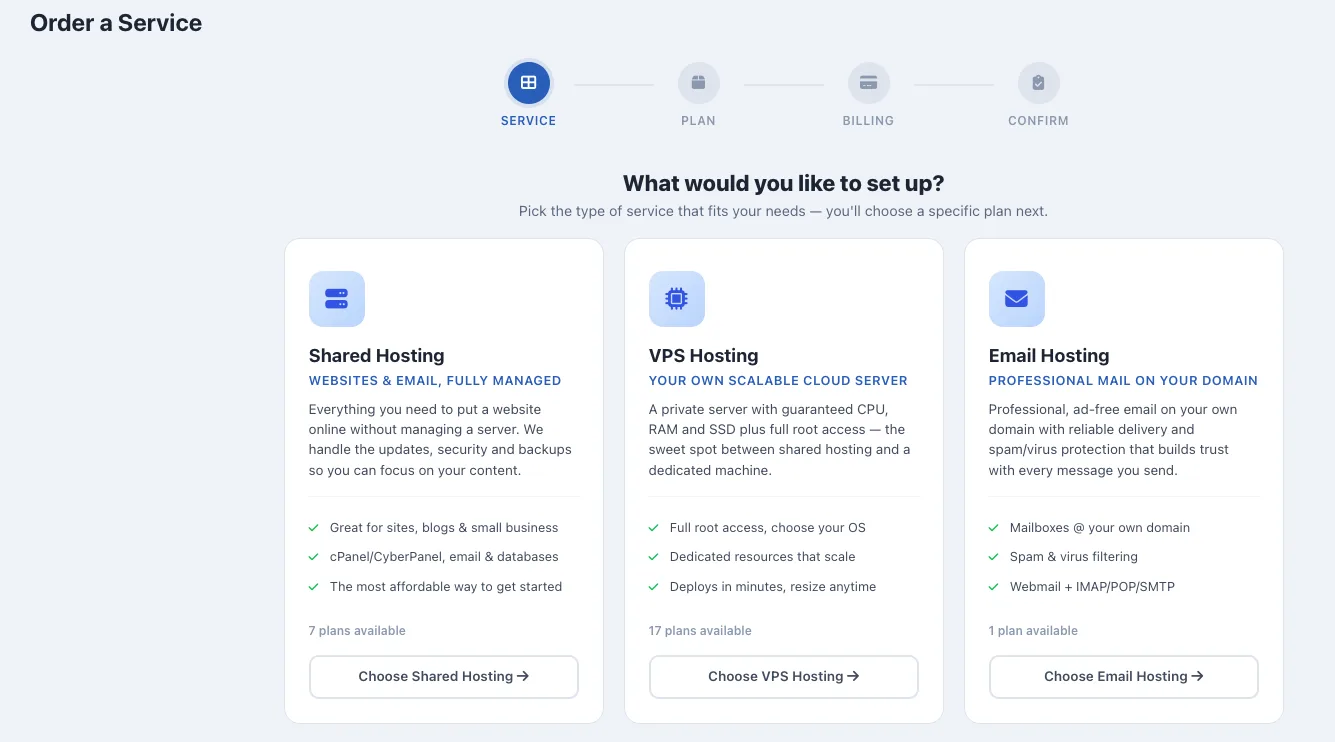
Choose the correct service card
The page shows three service types:
Shared HostingVPS HostingEmail Hosting
All three are valid services, but this article continues with Shared Hosting only. VPS Hosting is for customers who need their own cloud server environment, while Email Hosting is focused on professional mail on your domain.
When you are ready, click Choose Shared Hosting to move to plan selection.
Tip: If your main goal is to get a website online quickly with the simplest setup path, Shared Hosting is usually the right starting point.
Step 3: Compare the available plan cards
After you click Choose Shared Hosting, the order flow moves to the Shared Hosting plans page. This screen shows the available packages as separate plan cards so you can compare pricing and included resources before continuing.
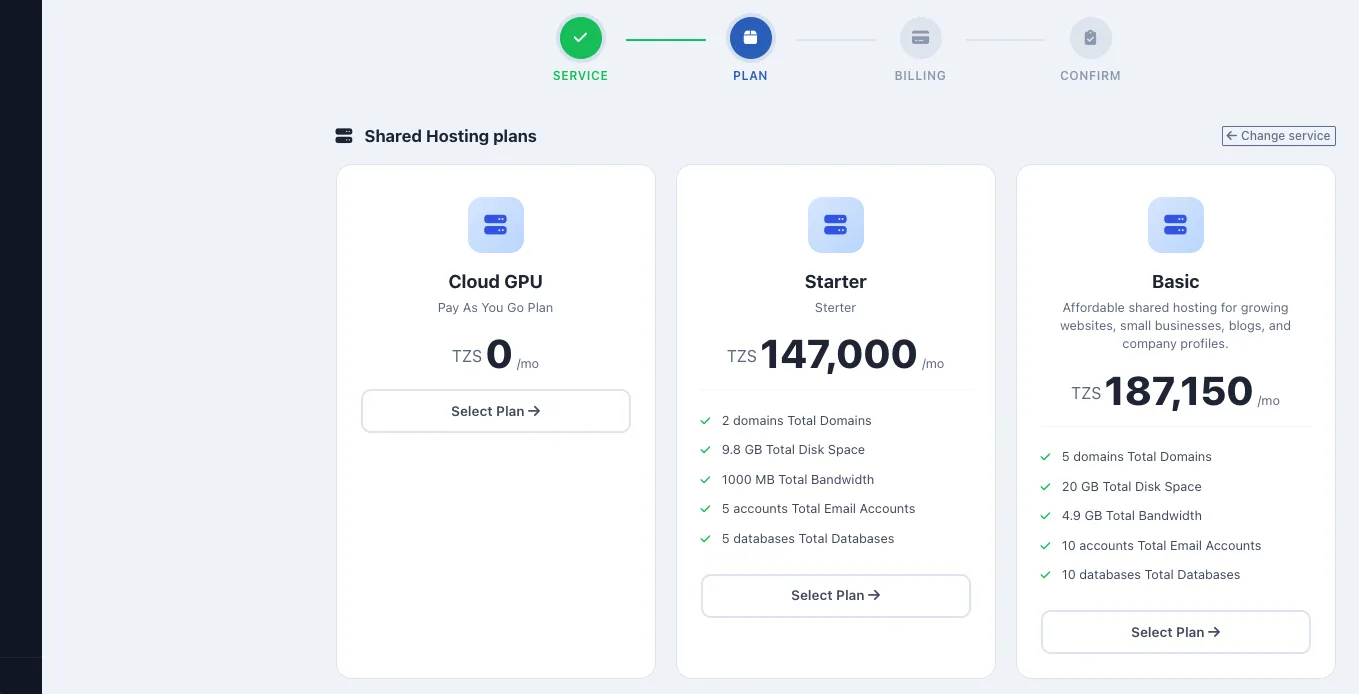
What is shown on the plan cards
The visible options include Starter and Basic, with another card also visible alongside them. This walkthrough continues with the Starter plan, but the ordering process is the same whichever plan you choose.
Starter plan details
The Starter card is shown with a price of TZS 147,000/mo. It includes:
- 2 domains
- 9.8 GB disk space
- 1000 MB bandwidth
- 5 email accounts
- 5 databases
Basic plan details
The Basic card is shown with a price of TZS 187,150/mo. It includes:
- 5 domains
- 20 GB disk space
- 4.9 GB bandwidth
- 10 email accounts
- 10 databases
Compared with Starter, Basic gives you more room across each main resource category. In this guide, continue by clicking Select Plan on Starter.
Tip: Do not choose by price alone. Check the number of domains, email accounts, and databases you need now, plus a little room for growth.
Step 4: Choose the billing cycle
After selecting Starter, the wizard moves to the Billing step. This is where you confirm how the plan will be billed before moving on to the domain step.
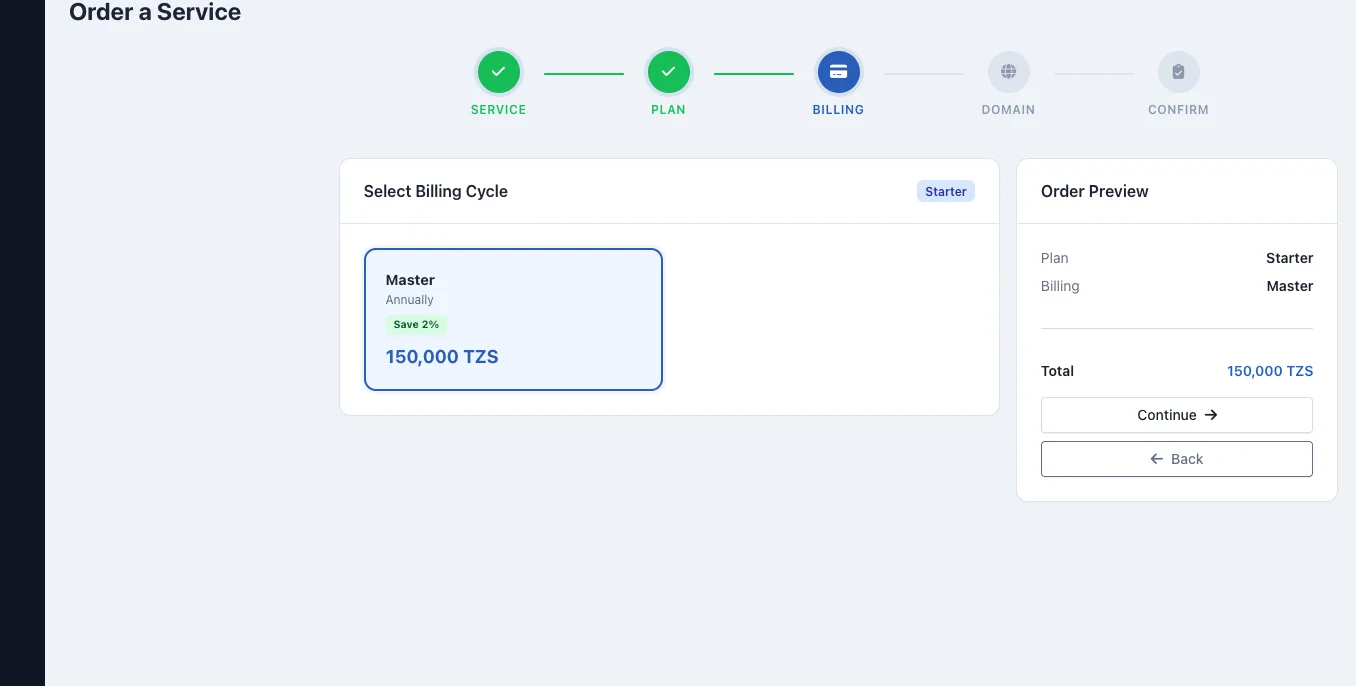
Review the billing option
In this example, the billing card displayed for Starter is Master. It is marked as Annually, shows a Save 2% label, and lists the total as 150,000 TZS.
The key details to verify are:
- Billing name:
Master - Term: Annually
- Discount note:
Save 2% - Total shown:
150,000 TZS
Check the order preview
Once the billing card is selected, review the order preview on the right. For this example, it should show Starter as the plan, Master as the billing label, and 150,000 TZS as the total.
When everything looks right, click Continue.
Tip: Compare the amount on the billing card with the amount in the order preview. For this example, both should show 150,000 TZS before you continue.
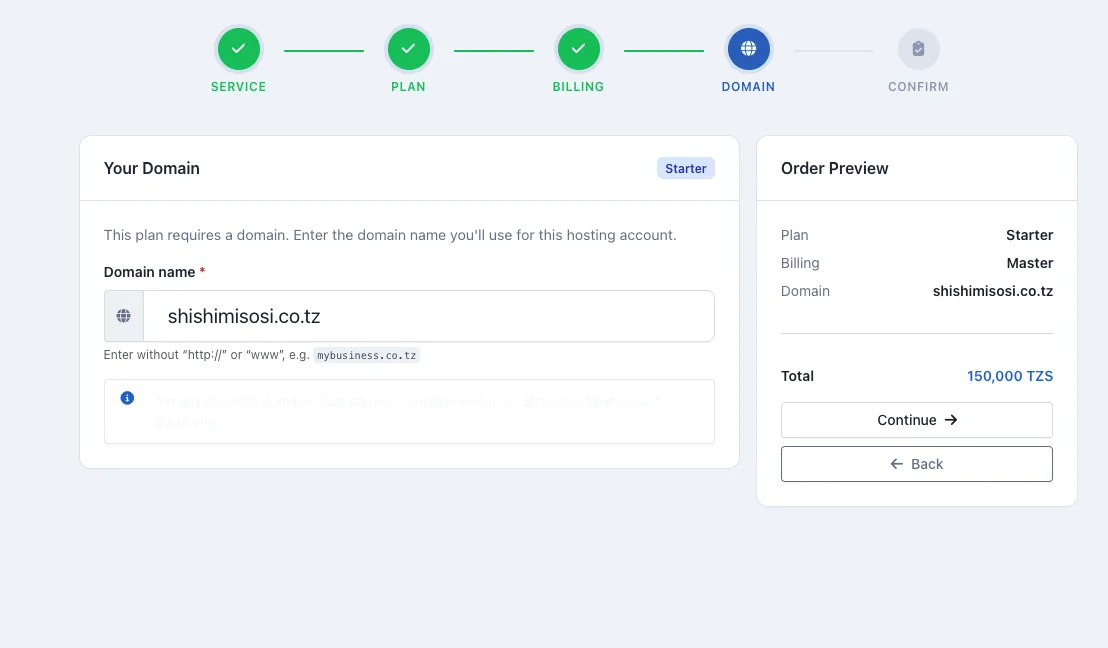
Step 5: Add the domain for the hosting account
After choosing the billing cycle, the wizard moves to the Domain step. This is where you enter the domain that will be connected to the new Shared Hosting account.
For this plan, a domain is required. You cannot complete the order or move to confirmation until a valid domain name has been entered.
Enter the domain in the correct format
In the Your Domain section, type the domain you want to use with the hosting account. Enter only the domain name itself.
For example, the correct format is shishimisosi.co.tz, not http://shishimisosi.co.tz, https://shishimisosi.co.tz, or www.shishimisosi.co.tz.
Warning: Always enter just the base domain name. Adding http://, https://, or www can cause the domain to be rejected or saved incorrectly.
Check the order preview before continuing
Once the domain is entered, review the order preview on the right. In this example, it should now show:
- Plan:
Starter - Billing:
Master - Domain:
shishimisosi.co.tz
If the spelling is correct, click Continue to move to the final review step.
Step 6: Review the order and create the service
You are now on the final confirmation screen. This is the last checkpoint before Momo Cloud creates the hosting service and generates the invoice, so review the details carefully.
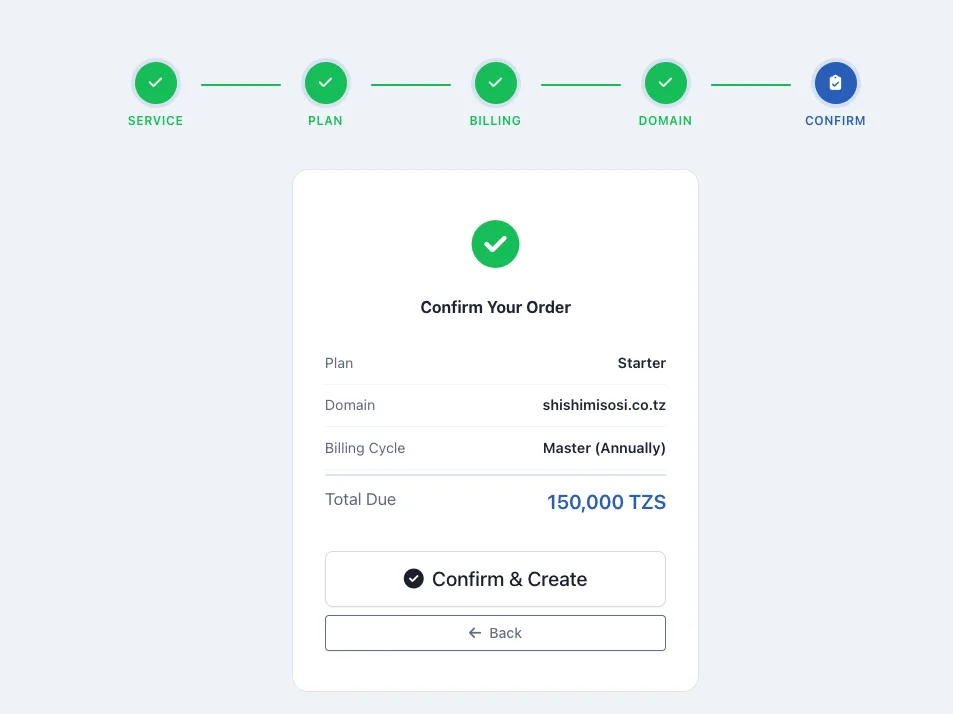
Confirm the order details
In the example shown, the summary displays:
- Plan:
Starter - Domain:
shishimisosi.co.tz - Billing Cycle:
Master (Annually) - Total Due:
150,000 TZS
If even one of those details is wrong, do not confirm yet. Use Back and correct it first.
Create the hosting order
When everything matches, click Confirm & Create. This creates the hosting service order and generates the invoice, but it does not fully activate the hosting account by itself. Payment is still required before activation can continue.
Tip: Treat this page like a final invoice preview. Check the domain character by character, especially if it uses an extension such as .co.tz.
Step 7: Choose a payment method from the invoice page
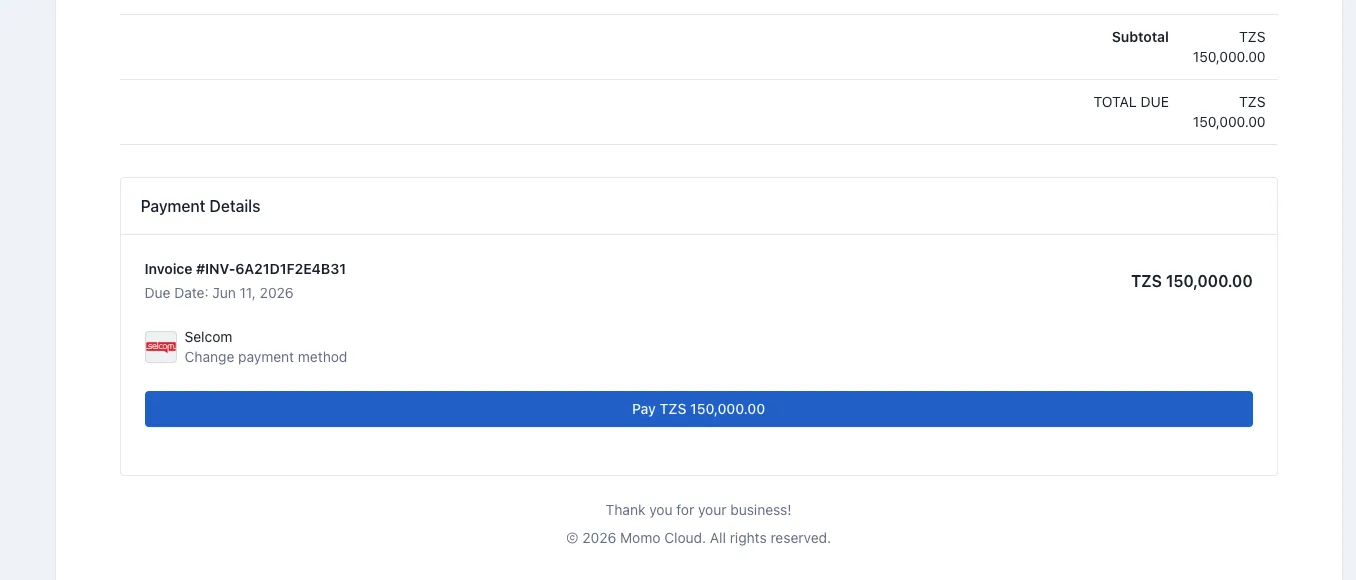
After the order is created, Momo Cloud takes you to the Payment Details page for the new invoice. This is where the process moves from ordering into billing.
Confirm the service was created successfully
A green success message confirms that the hosting service has been created and that payment is still required for activation. The order now exists in your account, but it is not yet ready to use until the invoice is paid.
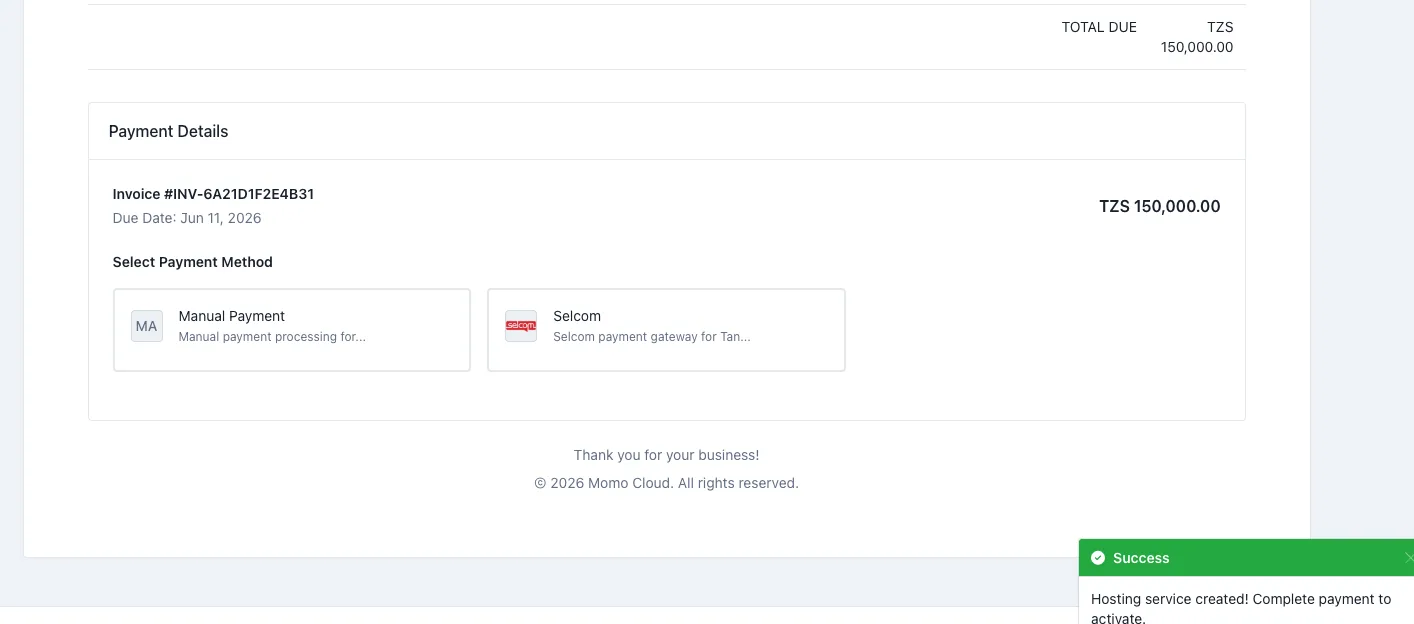
Review the invoice details
Before choosing a payment method, check the invoice number, due date, and total amount shown on the page. If you selected the annual shared hosting option in the earlier step, the amount here should match that choice. In the example, the invoice total is TZS 150,000.00.
Select the payment method
The visible payment methods on the invoice page are Manual Payment and Selcom. If you want to pay online immediately, select Selcom.
Once selected, the page shows the payment action button. Click the blue Pay TZS 150,000.00 button to continue to the Selcom payment gateway.
Tip: Compare the invoice total on Payment Details with the amount you saw on the final order review screen before you click Pay.
Step 8: Complete payment in the Selcom gateway
After you click the invoice payment button, the next page opens in the Selcom gateway. This is where you complete the actual transaction for the hosting order.
At the top of the Selcom page, you should see the merchant name, an order reference beginning with INV-, and the total amount to pay. In the example shown, the merchant is ZEPSON TECHNOLOGIES and the amount is TZS 150,000.
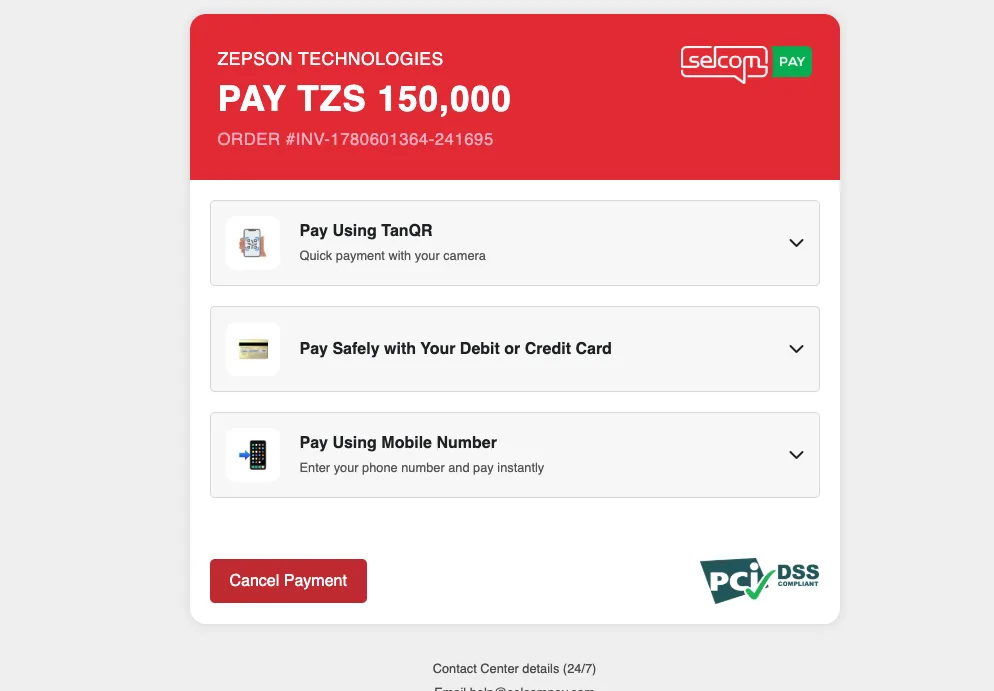
Choose your payment option
The visible options are:
Pay Using TanQRPay Safely with Your Debit or Credit CardPay Using Mobile Number
Each option appears as its own expandable section. Choose the one you want and follow the on-screen prompts.
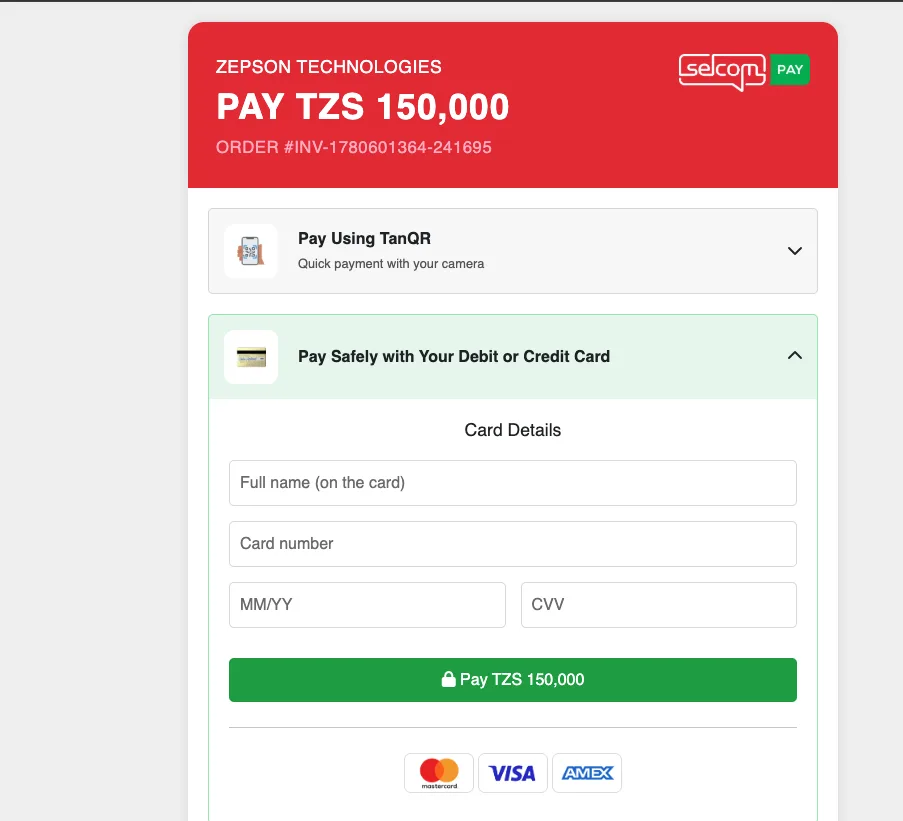
Pay with a debit or credit card
If you want to pay by card, expand Pay Safely with Your Debit or Credit Card. The visible fields are:
Full name (on the card)Card numberMM/YYfor the expiry dateCVV
Enter the card details exactly as shown on the card, then click the green Pay TZS 150,000 button. Your bank or card issuer may request an additional verification step.
Pay with TanQR or mobile number
If you prefer not to use a card, choose Pay Using TanQR or Pay Using Mobile Number and follow the prompts shown directly by Selcom.
Warning: Do not close the browser tab or leave the page while payment is still being processed. Wait until the transaction finishes and you are returned to the Momo Cloud flow.
Step 9: After payment, open the hosting dashboard and control panel
Once payment succeeds, the Shared Hosting order becomes a service you can manage from the client area. Return to Hosting, find the card for your new service, confirm it matches your domain, and click Manage.
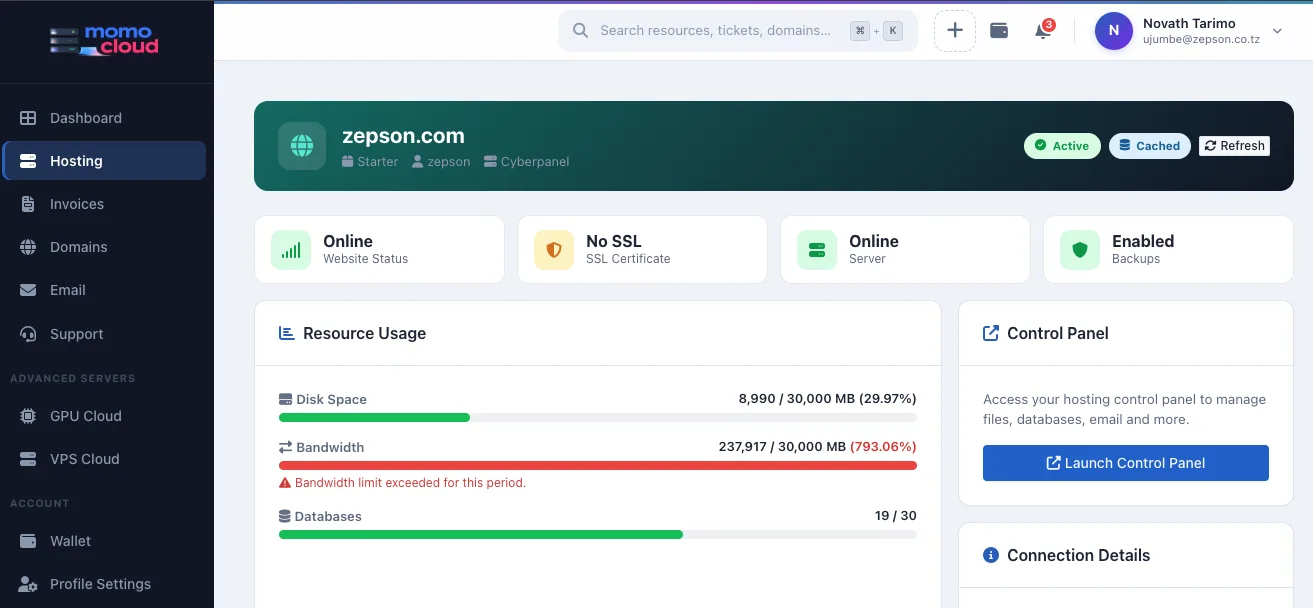
What you should see on the service dashboard
The detailed dashboard identifies the account by its domain name and can show badges for service status, website status, SSL, server, and backups. A normal service will typically show Active once provisioning is complete.
The page may also include resource usage for items such as disk space, bandwidth, and databases. Right after purchase, these values are often low because the account is still new.
Use Launch Control Panel
On the right side of the dashboard, click Launch Control Panel to open the hosting control panel for the account. This is where you handle day-to-day tasks such as uploading website files, creating email accounts, managing databases, and reviewing hosting settings.
Tip: If the invoice is paid but the hosting card still looks unchanged, refresh the client area and open Hosting again. The service status may take a short moment to update.
Common mistakes to avoid
The order flow is straightforward, but a few small mistakes can still cause confusion or delay activation. Most happen when a customer moves too quickly and assumes one completed screen means the next step is already finished.
Typing the domain in the wrong format
Enter only the plain domain name, such as example.com or mybusiness.co.tz. Do not enter http://example.com, https://example.com, or www.example.com.
Selecting the wrong service type
If your goal is a normal website hosting account, choose Shared Hosting, not VPS Hosting or Email Hosting. Those options lead to different products and different order flows.
Confusing the plan card price with the billing total
Read each screen in context. In this walkthrough, the important amount to verify during checkout is the billing and order summary total of 150,000 TZS, because that is the figure shown on the selected billing option, the confirmation screen, and the invoice.
Stopping after Confirm & Create
Clicking Confirm & Create creates the order and invoice, but it does not complete payment. The process is not finished until you pay the invoice and can open the service normally from the Hosting area.
Leaving the payment flow too early
On the invoice page, make sure the intended payment method is selected before you continue. Inside Selcom, complete the transaction and wait for the process to finish instead of closing the tab halfway through.
Warning: A service can appear in your account while still showing payment due. If you created the order but did not finish the Selcom transaction, return to the invoice and complete payment before assuming the hosting is active.
Need help?
If the order, invoice, or payment does not complete as expected, contact Momo Cloud support from your client area instead of starting the process again from scratch. That is usually the fastest way to resolve issues such as a service showing Payment Due, an invoice that stays unpaid, or a payment attempted in Selcom that did not clearly finish.
When asking for help, include the key details from your order: the invoice number, the selected hosting plan, and the domain name used for the hosting account. A short, specific request is much easier to investigate than a general message saying only that payment failed.
Tip: Before opening a ticket, check the Hosting section to see whether the service exists, whether it still shows payment due, and whether Manage or Launch Control Panel is already available.
If you are ready to get started, sign in at cloud.momo.tz, open Hosting, and follow the same order flow covered here. Once you can open the hosting dashboard and click Launch Control Panel, your Shared Hosting purchase is complete from the ordering side.